|
|
|
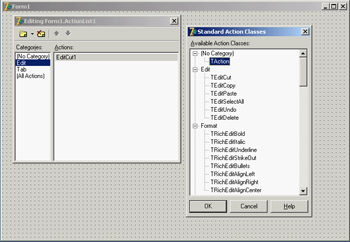
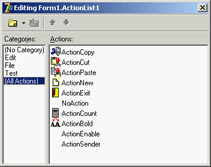
The ActionList ComponentDelphi's event architecture is very open: You can write a single event handler and connect it to the OnClick events of a toolbar button and a menu. You can also connect the same event handler to different buttons or menu items, because the event handler can use the Sender parameter to refer to the object that fired the event. It's a little more difficult to synchronize the status of toolbar buttons and menu items. If you have a menu item and a toolbar button that both toggle the same option, then every time the option is toggled, you must both add the check mark to the menu item and change the status of the button to show it pressed. To overcome this problem, Delphi includes an event-handling architecture based on actions. An action (or command) both indicates the operation to do when a menu item or button is clicked and determines the status of all the elements connected to the action. The connection of the action with the user interface of the linked controls is very important and should not be underestimated, because it is where you can get the real advantages of this architecture. There are many players in this event-handling architecture. The central role is certainly played by the action objects. An action object has a name, like any other component, and other properties that will be applied to the linked controls (called action clients). These properties include the Caption, the graphical representation (ImageIndex), the status (Checked, Enabled, and Visible), and the user feedback (Hint and HelpContext). There is also the ShortCut and a list of SecondaryShortCuts, the AutoCheck property for two-state actions, the help support properties, and a Category property used to arrange actions in logical groups. The base class for all action objects is TBasicAction, which introduces the abstract core behavior of an action, without any specific binding or correction (not even to menu items or controls). The derived TContainedAction class introduces properties and methods that enable actions to appear in an action list or action manager. The further-derived TCustomAction class introduces support for the properties and methods of menu items and controls that are linked to action objects. Finally, there is the derived ready-to-use TAction class. Each action object is connected to one or more client objects through an ActionLink object. Multiple controls, possibly of different types, can share the same action object, as indicated by their Action property. Technically, the ActionLink objects maintain a bidirectional connection between the client object and the action. The ActionLink object is required because the connection works in both directions. An operation on the object (such as a click) is forwarded to the action object and results in a call to its OnExecute event; an update to the status of the action object is reflected in the connected client controls. In other words, one or more client controls can create an ActionLink, which registers itself with the action object. You should not set the properties of the client controls you connect with an action, because the action will override the property values of the client controls. For this reason, you should generally write the actions first and then create the menu items and buttons you want to connect with them. Note also that when an action has no OnExecute handler, the client control is automatically disabled (or grayed), unless the DisableIfNoHandler property is set to False. The client controls connected to actions are usually menu items and various types of buttons (pushbuttons, check boxes, radio buttons, speed buttons, toolbar buttons, and the like), but nothing prevents you from creating new components that hook into this architecture. Component writers can even define new actions, as we'll do in Chapter 9 ("Writing Delphi Components"), and new link action objects. Besides a client control, some actions can also have a target component. Some predefined actions hook to a specific target component. Other actions automatically look for a target component in the form that supports the given action, starting with the active control. Finally, the action objects are held by an ActionList or ActionManager component, the only class of the basic architecture that shows up on the Component Palette. The action list receives the execute actions that aren't handled by the specific action objects, firing the OnExecuteAction. If even the action list doesn't handle the action, Delphi calls the OnExecuteAction event of the Application object. The ActionList component has a special editor you can use to create several actions, as you can see in Figure 6.9. In the editor, actions are displayed in groups, as indicated by their Category property. By simply setting this property to a new value, you instruct the editor to introduce a new category. These categories are basically logical groups, although in some cases a group of actions can work only on a specific type of target component. You might want to define a category for every pull-down menu or group them in some other logical way. Predefined Actions in DelphiWith the action list and the ActionManager editor, you can create a new action or choose one of the existing actions registered in the system. These are listed in a secondary dialog box, as shown in Figure 6.9. There are many predefined actions, which can be divided into logical groups:
In addition to handling the OnExecute event of the action and changing the status of the action to affect the client controls' user interface, an action can handle the OnUpdate event, which is activated when the application is idle. This gives you the opportunity to check the status of the application or the system and change the user interface of the controls accordingly. For example, the standard PasteEdit action enables the client controls only when the Clipboard contains some text. Actions in PracticeNow that you understand the main ideas behind this important Delphi feature, let's try an example. The program is called Actions, and it demonstrates a number of features of the action architecture. I began building it by placing a new ActionList component in its form and adding the three standard edit actions and a few custom ones. The form also has a panel with some speed buttons, a main menu, and a Memo control (the automatic target of the edit actions). Listing 6.3 is the list of the actions, extracted from the DFM file.
Listing 6.3: The Actions of the Actions Example
object ActionList1: TActionList
  Images = ImageList1
  object ActionCopy: TEditCopy
    Category = 'Edit'
    Caption = '&Copy'
    ShortCut = <Ctrl+C>
  end
  object ActionCut: TEditCut
    Category = 'Edit'
    Caption = 'Cu&t'
    ShortCut = <Ctrl+X>
  end
  object ActionPaste: TEditPaste
    Category = 'Edit'
    Caption = '&Paste'
    ShortCut = <Ctrl+V>
  end
  object ActionNew: TAction
    Category = 'File'
    Caption = '&New'
    ShortCut = <Ctrl+N>
    OnExecute = ActionNewExecute
  end
  object ActionExit: TAction
    Category = 'File'
    Caption = 'E&xit'
    ShortCut = <Alt+F4>
    OnExecute = ActionExitExecute
  end
  object NoAction: TAction
    Category = 'Test'
    Caption = '&No Action'
  end
  object ActionCount: TAction
    Category = 'Test'
    Caption = '&Count Chars'
    OnExecute = ActionCountExecute
    OnUpdate = ActionCountUpdate
  end
  object ActionBold: TAction
    Category = 'Edit'
    AutoCheck = True
    Caption = '&Bold'
    ShortCut = <Ctrl+B>
    OnExecute = ActionBoldExecute
  end
  object ActionEnable: TAction
    Category = 'Test'
    Caption = '&Enable NoAction'
    OnExecute = ActionEnableExecute
  end
  object ActionSender: TAction
    Category = 'Test'
    Caption = 'Test &Sender'
    OnExecute = ActionSenderExecute
  end
end
All these actions are connected to the items of a MainMenu component and some of them also to the buttons of a Toolbar control. Notice that the images selected in the ActionList control affect the actions in the editor only, as you can see in Figure 6.10. In order for the ImageList images to show up in the menu items and in the toolbar buttons, you must also select the image list in the MainMenu and in the Toolbar components. The three predefined actions for the Edit menu don't have associated handlers, but these special objects have internal code to perform the related action on the active edit or memo control. These actions also enable and disable themselves, depending on the content of the Clipboard and on the existence of selected text in the active edit control. Most other actions have custom code, except the NoAction object; because it has no code, the menu item and the button connected with this command are disabled, even if the Enabled property of the action is set to True. I've added to the example and to the Test menu another action that enables the menu item connected to the NoAction object: procedure TForm1.ActionEnableExecute(Sender: TObject); begin NoAction.DisableIfNoHandler := False; NoAction.Enabled := True; ActionEnable.Enabled := False; end; Setting Enabled to True produces the effect for only a short time, unless you set the Disable-IfNoHandler property as discussed in the previous section. Once this operation is done, you disable the current action, because there is no need to issue the same command again. This is different from an action you can toggle, such as the Edit ® Bold menu item and the corresponding speed button. Here is the code of the Bold action (which has the AutoCheck property set to True, so that it doesn't need to change the status of the Checked property in code):
procedure TForm1.ActionBoldExecute(Sender: TObject);
begin
  with Memo1.Font do
    if fsBold in Style then
      Style := Style - [fsBold]
    else
      Style := Style + [fsBold];
end;
The ActionCount object has very simple code, but it demonstrates an OnUpdate handler; when the memo control is empty, it is automatically disabled. You could obtain the same effect by handling the OnChange event of the memo control itself, but in general it might not always be possible or easy to determine the status of a control simply by handling one of its events. Here is the code for the two handlers of this action:
procedure TForm1.ActionCountExecute(Sender: TObject);
begin
  ShowMessage ('Characters: ' + IntToStr (Length (Memo1.Text)));
end;

procedure TForm1.ActionCountUpdate(Sender: TObject);
begin
  ActionCount.Enabled := Memo1.Text <> '';
end;
Finally, I've added a special action to test the action event handler's sender object and get some other system information. Besides showing the object class and name, I've added code that accesses the action list object. I've done this mainly to show that you can access this information and how to do it:
procedure TForm1.ActionSenderExecute(Sender: TObject);
begin
  Memo1.Lines.Add ('Sender class: ' + Sender.ClassName);
  Memo1.Lines.Add ('Sender name: ' + (Sender as TComponent).Name);
  Memo1.Lines.Add ('Category: ' + (Sender as TAction).Category);
  Memo1.Lines.Add (
    'Action list name: ' + (Sender as TAction).ActionList.Name);
end;
You can see the output of this code in Figure 6.11, along with the user interface of the example. Notice that the Sender is not the menu item you've selected, even if the event handler is connected to it. The Sender object, which fires the event, is the action, which intercepts the user operation. 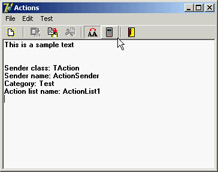
Figure 6.11: The Actions example, with a detailed description of the Sender of an Action object's OnExecute event Finally, keep in mind that you can also write handlers for the events of the ActionList object itself, which play the role of global handlers for all the actions in the list, and for the Application global object, which fires for all the actions of the application. Before calling the action's OnExecute event, Delphi activates the ActionList's OnExecute event and the Application global object's OnActionExecute event. These events can look at the action, eventually execute some shared code, and then stop the execution (using the Handled parameter) or let it reach the next level. If no event handler is assigned to respond to the action, either at the action list, application, or action level, then the application tries to identify a target object to which the action can apply itself.
The Toolbar and ActionList of an EditorIn Chapter 5, I built the RichBar example to demonstrate the development of an editor with a toolbar and a status bar. Of course, I should have also added a menu bar to the form, but doing so would have created quite a few troubles in synchronizing the status of the toolbar buttons with those of the menu items. A very good solution to this problem is to use actions, as I've done in the MdEdit1 example discussed in this section. The application is based on an ActionList component, which includes actions for file handling and Clipboard support, with code similar to the RichBar version. The font type and color selections are still based on combo boxes, so they don't involve actions—the same is true for the drop-down menu of the Size button. The menu, however, has a few extra commands, including one for character counting and one for changing the background color. These commands are based on actions, and the same is true for the three new paragraph justification buttons (and menu commands). One of the key differences in this new version is that the code never refers to the status of the toolbar buttons, but eventually modifies the status of the actions. In other cases I've used the actions' OnUpdate events. For example, the RichEditSelectionChange method doesn't update the status of the Bold button, which is connected to an action with the following OnUpdate handler: procedure TFormRichNote.acBoldUpdate(Sender: TObject); begin acBold.Checked := fsBold in RichEdit.SelAttributes.Style; end; Similar OnUpdate event handlers are available for most actions, including the counting operations (available only if there is some text in the RichEdit control), the Save operation (available if the text has been modified), and the Cut and Copy operations (available only if some text is selected): procedure TFormRichNote.acCountcharsUpdate(Sender: TObject); begin acCountChars.Enabled := RichEdit.GetTextLen > 0; end; procedure TFormRichNote.acSaveUpdate(Sender: TObject); begin acSave.Enabled := Modified; end; procedure TFormRichNote.acCutUpdate(Sender: TObject); begin acCut.Enabled := RichEdit.SelLength > 0; acCopy.Enabled := acCut.Enabled; end; In the older example, the status of the Paste button was updated in the OnIdle event of the Application object. Now that you're using actions you can convert it into yet another OnUpdate handler (see Chapter 5 for details on this code): procedure TFormRichNote.acPasteUpdate(Sender: TObject); begin acPaste.Enabled := SendMessage (RichEdit.Handle, em_CanPaste, 0, 0) <> 0; end; The three paragraph-alignment buttons and the related menu items work like radio buttons: they're mutually exclusive, and one of the three options is always selected. For this reason, the actions have the GroupIndex set to 1, the corresponding menu items have the RadioItem property set to True, and the three toolbar buttons have their Grouped property set to True and the AllowAllUp property set to False. (They are also visually enclosed between two separators.) This arrangement is required so that the program can set the Checked property for the action corresponding to the current style, which avoids unchecking the other two actions directly. This code is part of the OnUpdate event of the action list, because it applies to multiple actions:
procedure TFormRichNote.ActionListUpdate(Action: TBasicAction;
  var Handled: Boolean);
begin
  // check the proper paragraph alignment
  case RichEdit.Paragraph.Alignment of
    taLeftJustify: acLeftAligned.Checked := True;
    taRightJustify: acRightAligned.Checked := True;
    taCenter: acCentered.Checked := True;
  end;
  // checks the caps lock status
  CheckCapslock;
end;
Finally, when one of these buttons is selected, the shared event handler uses the value of the Tag, set to the corresponding value of the TAlignment enumeration, to determine the proper alignment: procedure TFormRichNote.ChangeAlignment(Sender: TObject); begin RichEdit.Paragraph.Alignment := TAlignment ((Sender as TAction).Tag); end; |
|
||||||||||||||||||||||||||||||||||||||||||||||||||||||||||||||||||||||||||||||||||||||||||||||||||||||||||||||||||||||||||||||||||||||||||||||||||||||||||||||||||||||||||||||||||||||||||||||
|
| Copyright © 2004-2024 "Delphi Sources" by BrokenByte Software. Delphi Programming Guide |
   |