|
|
|
The ActionManager ArchitectureYou have seen that actions and the ActionManager component can play a central role in the development of Delphi applications, because they allow a much better separation of the user interface from the actual code of the application. The user interface can now easily change without impacting the code too much. The drawback of this approach is that a programmer has more work to do. To create a new menu item, you need to add the corresponding action first, then move to the menu, add the menu item, and connect it to the action. To solve this issue, and to provide developers and end users with some advanced features, Delphi 6 introduced a new architecture based on the ActionManager component, which largely extends the role of actions. The ActionManager has a collection of actions as well as a collection of toolbars and menus tied to them. The development of these toolbars and menus is completely visual: You drag actions from a special component editor of the ActionManager to the toolbars to access the buttons you need. Moreover, you can let the end user of your programs do the same operation, rearranging their toolbars and menus beginning with the actions you provide them. In other words, using this architecture allows you to build applications with a modern user interface, customizable by the user. The menu can show only the recently used items (as many Microsoft programs do), allows for animation, and more. This architecture is centered on the ActionManager component, but it also includes a few other components found at the end of the Additional page of the palette:
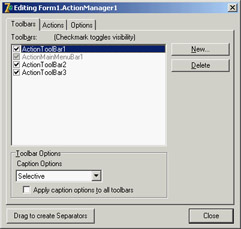
Building a Simple DemoBecause this architecture is mostly visual, a demo is worth more than a general discussion (although a printed book is not the best way to discuss a highly visual series of operations). To create a sample program based on this architecture, drop an ActionManager component on a form and double-click it to open its component editor, shown in Figure 6.16. Notice that this editor is not modal, so you can keep it open while doing other operations in Delphi. This same dialog box is also displayed by the CustomizeDlg component, although with some limited features (for example, adding new actions is disabled). The editor's three pages are as follows:
The AcManTest program is an example that uses some of the standard actions and a RichEdit control to showcase the use of this architecture (I haven't written any custom code to make the actions work better, because I wanted to focus only on the action manager for this example). You can experiment with it at design time or run it, click the Customize button, and see what an end user can do to customize the application (see Figure 6.17). 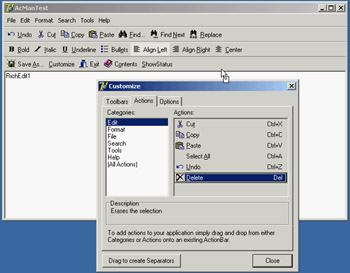
Figure 6.17: Using the CustomizeDlg component, you can let a user customize the toolbars and the menu of an appli-cation by dragging items from the dialog box or moving them around in the action bars. In the program, you can prevent the user from doing some operations on actions. Any specific element of the user interface (a TActionClient object) has a ChangedAllowed property that you can use to disable modify, move, and delete operations. Any action client container (the visual bars) has a property to disable hiding itself (AllowHiding by default is set to True). Each ActionBar Items collection has a Customizable option you can turn off to disable all user changes to the entire bar.
To make user settings persistent, I've connected a file (called settings) to the FileName property of the ActionManager component. When you assign this property, you should enter the name of the file you want to use; when you start the program, the file will be created for you by the ActionManager. The persistency is accomplished by streaming each ActionClientItem connected with the action manager. Because these action client items are based on the user settings and maintain state information, a single file collects both user changes to the interface and usage data. Because Delphi stores user setting and status information in a file you provide, you can make your application support multiple users on a single computer. Simply use a file of settings for each of them (under the MyDocuments or MySettings virtual folder) and connect it to the action manager as the program starts (using the current user of the computer or after some custom login). Another possibility is to store these settings over the network, so that even when a user moves to a different computer, the current personal settings will move along with them. In the program, I've decided to store the settings in a file store in the same folder as the program, assigning the relative path (the filename) to the ActionManager's FileName property. The component will fill in the complete filename with the program folder, easily finding the file to load. However, the file includes among its data its own filename, with an absolute path. So, when it is time to save the file, the operation may refer to an older path. This prevents you from copying this program with its settings to a different folder (for example, this is an issue for the AcManTest demo). You can reset the FileName property after loading the file. As a further alternative, you could set the filename at runtime, in the form's OnCreate event. In this case you also have to force the file to reload, because you are assigning it after the ActionManager component and the ActionBars have already been created and initialized. However, you might want to force the filename after loading it, as just described:
procedure TForm1.FormCreate(Sender: TObject);
begin
  ActionManager1.FileName :=
    ExtractFilePath (Application.ExeName) + 'settings';
  ActionManager1.LoadFromFile(ActionManager1.FileName);
  // reset the settings file name after loading it (relative path)
  ActionManager1.FileName :=
     ExtractFilePath (Application.ExeName) + 'settings';
end;
Least-Recently Used Menu ItemsOnce a file for the user settings is available, the ActionManager will save the user preferences into it and also use it to track the user activity. This is essential to let the system remove menu items that haven't been used for some time, making them available in an extended menu using the same user interface adopted by Microsoft (see Figure 6.18 for an example). 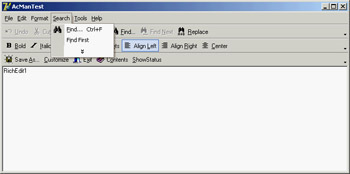
Figure 6.18: The ActionManager disables least-recently used menu items that you can still see by selecting the menu extension command. The ActionManager doesn't just show the least-recently used items: It allows you to customize this behavior in a very precise way. Each action bar has a SessionCount property that keeps track of the number of times the application has been executed. Each ActionClientItem has a LastSession property and a UsageCount property used to track user operations. Notice, by the way, that a user can reset all this dynamic information by using the Reset Usage Data button in the customization dialog. The system calculates the number of sessions the action has gone unused by computing the difference between the number of times the application has been executed (SessionCount) and the last session in which the action has been used (LastSession). The value of UsageCount is used to look up in the PrioritySchedule how many sessions the items can go unused before it is removed. In other words, the PrioritySchedule maps each the usage count with a number of unused sessions. By modifying the PrioritySchedule, you can determine how quickly the items are removed in case they are not used. You can also prevent this system from being activated for specific actions or groups of actions. The Items property of the ActionManager's ActionBars has a HideUnused property you can toggle to disable this feature for an entire menu. To make a specific item always visible, regardless of the actual usage, you can also set its UsageCount property to –1. However, the user settings might override this value. To help you better understand how this system works, I've added a custom action (ActionShowStatus) to the AcManTest example. The action has the following code that saves the current action manager settings to a memory stream, converts the stream to text, and shows it in the memo (refer to Chapter 4 for more information about streaming):
procedure TForm1.ActionShowStatusExecute(Sender: TObject);
var
  memStr, memStr2: TMemoryStream;
begin
  memStr := TMemoryStream.Create;
  try
    memStr2 := TMemoryStream.Create;
    try
      ActionManager1.SaveToStream(memStr);
      memStr.Position := 0;
      ObjectBinaryToText(memStr, memStr2);
      memStr2.Position := 0;
      RichEdit1.Lines.LoadFromStream(memStr2);
    finally
      memStr2.Free;
    end;
  finally
    memStr.Free;
  end;
end;
The output you obtain is the textual version of the settings file automatically updated at each execution of the program. Here is a small portion of this file, including the details of one of the pull-down menus and plenty of comments:
item // File pulldown of the main menu action bar
  Items = <
    item
      Action = Form1.FileOpen1
      LastSession = 19 // was used in the last session
      UsageCount = 4 // was used four times
    end
    item
      Action = Form1.FileSaveAs1 // never used
    end
    item
      Action = Form1.FilePrintSetup1
      LastSession = 7 // used some time ago
      UsageCount = 1 // only once
    end
    item
      Action = Form1.FileRun1 // never used
    end
    item
      Action = Form1.FileExit1 // never used
    end>
  Caption = '&File'
  LastSession = 19
  UsageCount = 5 // the sum of the usage count of the items
end
Porting an Existing ProgramIf this architecture is useful, you'll probably need to redo most of your applications to take advantage of it. However, if you're already using actions (with the ActionList component), this conversion will be much simpler. The ActionManager has its own set of actions but can also use actions from another ActionManager or ActionList. The ActionManager's LinkedActionLists property is a collection of other containers of actions (ActionLists or ActionManagers), which can be associated with the current ActionManager. Associating all the various groups of actions is useful because you can let a user customize the entire user interface with a single dialog box. If you hook external actions and open the ActionManager editor, you'll see in the Actions page a combo box listing the current ActionManager plus the other action containers linked to it. You can choose one of these containers to see its set of actions and change their properties. The All Action option in this combo box allows you to work on all the actions from the various containers at once; however, I've noticed that at startup it is selected but not always effective. Reselect it to see all the actions. As an example of porting an existing application, I've extended the program built throughout this chapter into the MdEdit3 example. This example uses the same action list as the previous version, hooked to an ActionManager that has the extra customize property to let users rearrange the user interface. Unlike the earlier AcManDemo program, the MdEdit3 example uses a ControlBar as a container for the action bars (a menu, three toolbars, and the usual combo boxes) and has full support for dragging them outside the container as floating bars and dropping them into the lower ControlBar. To accomplish this, I only had to modify the source code slightly to refer to the new classes for the containers (TCustomActionToolBar instead of TToolBar) in the ControlBarLowerDockOver method. I also found that the ActionToolBar component's OnEndDock event passes as parameter an empty target when the system creates a floating form to host the control, so I couldn't easily give this form a new custom caption (see the form's EndDock method). Using List ActionsYou'll see more examples of the use of this architecture in the chapters devoted to MDI and database programming (Chapter 8 and Chapter 13, for example). For the moment, I want to add an extra example showing how to use a rather complex group of standard actions: the list actions. List actions comprise two different groups. Some of them (such as Move, Copy, Delete, Clear, and Select All) are normal actions that work on list boxes or other lists. The VirtualListAction and StaticListAction, however, define actions providing a list of items that will be displayed in a toolbar as a combo box. The ListActions demo highlights both groups of list actions; its ActionManager has five of actions displayed on two separate toolbars. This is a summary of the actions (I've omitted the action bars portion of the component's DFM file):
object ActionManager1: TActionManager
  ActionBars.SessionCount = 1
  ActionBars = <...>
  object StaticListAction1: TStaticListAction
    Caption = 'Numbers'
    Items.CaseSensitive = False
    Items.SortType = stNone
    Items = <
      item
        Caption = 'one'
      end
      item
        Caption = 'two'
      end
      ...>
    OnItemSelected = ListActionItemSelected
  end
  object VirtualListAction1: TVirtualListAction
    Caption = 'Items'
    OnGetItem = VirtualListAction1GetItem
    OnGetItemCount = VirtualListAction1GetItemCount
    OnItemSelected = ListActionItemSelected
  end
  object ListControlCopySelection1: TListControlCopySelection
    Caption = 'Copy'
    Destination = ListBox2
    ListControl = ListBox1
  end
  object ListControlDeleteSelection1: TListControlDeleteSelection
    Caption = 'Delete'
  end
  object ListControlMoveSelection2: TListControlMoveSelection
    Caption = 'Move'
    Destination = ListBox2
    ListControl = ListBox1
  end
end
The program has also two list boxes in its form, which are used as action targets. The Copy and Move actions are tied to these two list boxes by their ListControl and Destination properties. The Delete action automatically works with the list box having the input focus. The StaticListAction defines a series of alternative items in its Items collection. This is not a plain string list, because any item also has an ImageIndex that lets you add graphical elements to the control displaying the list. You can, of course, add more items to this list programmatically. However, if the list is highly dynamic, you can also use the VirtualListAction. This action doesn't define a list of items but has two events you can use to provide strings and images for the list: OnGetItemCount allows you to indicate the number of items to display, and OnGetItem is then called for each specific item. In the ListActions demo, the VirtualListAction has the following event handlers for its definition, producing the list you can see in the active combo box in Figure 6.19: procedure TForm1.VirtualListAction1GetItemCount(Sender: TCustomListAction; var Count: Integer); begin Count := 100; end; procedure TForm1.VirtualListAction1GetItem(Sender: TCustomListAction; const Index: Integer; var Value: String; var ImageIndex: Integer; var Data: Pointer); begin Value := 'Item' + IntToStr (Index); end;
Both the static list and the virtual list have an OnItemSelected event. In the shared event handler, I've written the following code to add the current item to the form's first list box: procedure TForm1.ListActionItemSelected(Sender: TCustomListAction; Control: TControl); begin ListBox1.Items.Add ((Control as TCustomActionCombo).SelText); end; In this case, the sender is the custom action list, but the ItemIndex property of this list is not updated with the selected item. However, by accessing the visual control that displays the list, you can obtain the value of the selected item. |
|
||||||||||||||||||||||||||||||||||||||||||||||||||||||||||||||||||||||||||||||||||||||||||||||||||||||||||||||||||||||||||||||||||||||||||||||||||||||||||||||||||||||||||||||||||||||||||||||
|
| Copyright © 2004-2024 "Delphi Sources" by BrokenByte Software. Delphi Programming Guide |
   |