|
|
|
Creating a Dialog BoxI stated earlier in this chapter that a dialog box is not very different from other forms. To build a dialog box instead of a form, you just select the bsDialog value for the BorderStyle property. With this simple change, the interface of the form becomes like that of a dialog box, with no system icon and no Minimize and Maximize boxes. Of course, such a form has the typical thick dialog box border, which is non-resizable. Once you have built a dialog box form, you can display it as a modal or modeless window using the two usual show methods (Show and ShowModal). Modal dialog boxes, however, are more common than modeless ones. This is the reverse of forms; modal forms should generally be avoided, because a user won't expect them. The Dialog Box of the RefList ExampleIn Chapter 5, "Visual Controls," we explored the RefList/QRefList program, which used a ListView control to display references to books, magazines, websites, and more. In the RefList2 version (and its QRefList2 CLX counterpart), I added to the basic version a dialog box that's used in two different circumstances: adding new items to the list and editing existing items.
The only particularly interesting feature of this form in the VCL example is the use of the ComboBoxEx component, which is attached to the same ImageList used by the ListView control of the main form. The drop-down items of the list, used to select a type of reference, include both a textual description and the corresponding image. As I mentioned, this dialog box is used in two different cases. The first takes place as the user selects File ® Add Items from the menu:
procedure TForm1.AddItems1Click(Sender: TObject);
var
  NewItem: TListItem;
begin
  FormItem.Caption := 'New Item';
  FormItem.Clear;
  if FormItem.ShowModal = mrOK then
  begin
    NewItem := ListView1.Items.Add;
    NewItem.Caption := FormItem.EditReference.Text;
    NewItem.ImageIndex := FormItem.ComboType.ItemIndex;
    NewItem.SubItems.Add (FormItem.EditAuthor.Text);
    NewItem.SubItems.Add (FormItem.EditCountry.Text);
  end;
end;
Besides setting the proper caption for the form, this procedure initializes the dialog box, because you are entering a new value. If the user clicks OK, however, the program adds a new item to the list view and sets all its values. To empty the dialog's edit boxes, the program calls the custom Clear method, which resets the text of each edit box control:
procedure TFormItem.Clear;
var
  I: Integer;
begin
  // clear each edit box
  for I := 0 to ControlCount - 1 do
    if Controls [I] is TEdit then
      TEdit (Controls[I]).Text := '';
end;
Editing an existing item requires a slightly different approach. First, the current values are moved to the dialog box before it is displayed. Second, if the user clicks OK, the program modifies the current list item instead of creating a new one. Here is the code:
procedure TForm1.ListView1DblClick(Sender: TObject);
begin
  if ListView1.Selected <> nil then
  begin
    // dialog initialization
    FormItem.Caption := 'Edit Item';
    FormItem.EditReference.Text := ListView1.Selected.Caption;
    FormItem.ComboType.ItemIndex := ListView1.Selected.ImageIndex;
    FormItem.EditAuthor.Text := ListView1.Selected.SubItems [0];
    FormItem.EditCountry.Text := ListView1.Selected.SubItems [1];

    // show it
    if FormItem.ShowModal = mrOK then
    begin
      // read the new values
      ListView1.Selected.Caption := FormItem.EditReference.Text;
      ListView1.Selected.ImageIndex := FormItem.ComboType.ItemIndex;
      ListView1.Selected.SubItems [0] := FormItem.EditAuthor.Text;
      ListView1.Selected.SubItems [1] := FormItem.EditCountry.Text;
    end;
  end;
end;
You can see the effect of this code in Figure 7.11. Notice that the code used to read the value of a new item or modified item is similar. In general, you should try to avoid this type of duplicated code and perhaps place the shared code statements in a method added to the dialog box. In this case, the method could receive as parameter a TListItem object and copy the proper values into it. 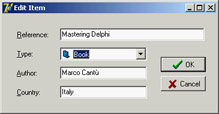
Figure 7.11: The dialog box of the RefList2 example used in edit mode. Notice the ComboBoxEx graphical component in use.
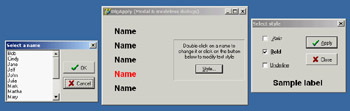
A Modeless Dialog BoxThe second example of dialog boxes shows a more complex modal dialog box that uses the standard approach as well as a modeless dialog box. The main form of the DlgApply example (and of the identical CLX-based QDlgApply demo) has five labels with names, as you can see in Figure 7.12 and by viewing the source code of the example. If the user clicks a name, its color changes to red; if the user double-clicks it, the program displays a modal dialog box with a list of names to choose from. If the user clicks the Style button, a modeless dialog box appears, allowing the user to change the font style of the main form's labels. The five labels on the main form are connected to two methods, one for the OnClick event and the second for the OnDoubleClick event. The first method turns the last label a user clicked red, resetting all the others to black (they have the Tag property set to 1, as a sort of group index). Notice that the same method is associated with all the labels:
procedure TForm1.LabelClick(Sender: TObject);
var
  I: Integer;
begin
  for I := 0 to ComponentCount - 1 do
   if (Components[I] is TLabel) and (Components[I].Tag = 1) then
     TLabel (Components[I]).Font.Color := clBlack;
  // set the color of the clicked label to red
  (Sender as TLabel).Font.Color := clRed;
end;
The second method common to all the labels is the OnDoubleClick event handler. The LabelDoubleClick method selects the Caption of the current label (indicated by the Sender parameter) in the list box of the dialog and then shows the modal dialog box. If the user closes the dialog box by clicking OK and a list item is selected, the selection is copied back to the label's caption:
procedure TForm1.LabelDoubleClick(Sender: TObject);
begin
  with ListDial.Listbox1 do
  begin
    // select the current name in the list box
    ItemIndex := Items.IndexOf (Sender as TLabel).Caption);
    // show the modal dialog box, checking the return value
    if (ListDial.ShowModal = mrOk) and (ItemIndex >= 0) then
      // copy the selected item to the label
      (Sender as TLabel).Caption := Items [ItemIndex];
  end;
end;
The modeless dialog box, by contrast, has a lot of coding behind it. The main form displays the dialog box when the Style button is clicked (notice that the button caption ends with three dots to indicate that it leads to a dialog box), by calling its Show method. You can see the dialog box running in Figure 7.12. Two buttons, Apply and Close, replace the OK and Cancel buttons in a modeless dialog box. (The fastest way to obtain these buttons is to select the bkOK or bkCancel value for the Kind property and then edit the Caption.) At times, you may see a Cancel button that works as a Close button, but the OK button in a modeless dialog box usually has no meaning. Instead, one or more buttons might perform specific actions on the main window, such as Apply, Change Style, Replace, Delete, and so on. If the user clicks one of the check boxes in this modeless dialog box, the style of the sample label's text at the bottom changes accordingly. You accomplish this by adding or removing the specific flag that indicates the style, as in the following OnClick event handler:
procedure TStyleDial.ItalicCheckBoxClick(Sender: TObject);
begin
  if ItalicCheckBox.Checked then
    LabelSample.Font.Style := LabelSample.Font.Style + [fsItalic]
  else
    LabelSample.Font.Style := LabelSample.Font.Style - [fsItalic];
end;
When the user clicks the Apply button, the program copies the style of the sample label to each of the form's labels, rather than consider the values of the check boxes: procedure TStyleDial.ApplyBitBtnClick(Sender: TObject); begin Form1.Label1.Font.Style := LabelSample.Font.Style; Form1.Label2.Font.Style := LabelSample.Font.Style; ... As an alternative, instead of referring to each label directly, you can look for it by calling the FindComponent method of the form, passing the label name as a parameter, and then casting the result to the TLabel type. The advantage of this approach is that you can create the names of the various labels with a for loop:
procedure TStyleDial.ApplyBitBtnClick(Sender: TObject);
var
  I: Integer;
begin
  for I := 1 to 5 do
    (Form1.FindComponent ('Label' + IntToStr (I)) as TLabel).Font.Style :=
      LabelSample.Font.Style;
end;
This second version of the code is certainly slower, because it has more operations to do, but you won't notice the difference because it is still very fast. Of course, this approach is also more flexible; if you add a new label, you only need to fix the higher limit of the for loop, provided all the labels have consecutive numbers. Notice that when the user clicks the Apply button, the dialog box does not close—only the Close button has this effect. Consider also that this dialog box needs no initialization code because the form is not destroyed, and its components maintain their status each time the dialog box is displayed. Notice, however, that in the CLX version of the program, QDlgApply, the dialog is modal, even if it is called with the Show method. |
|
|||||||||||||||||||||||||||||||||||||||||||||||||||||||||||||||||||||||||||||||||||||||||||||||||||||||||||||||||||||||||||||||||||||||||||||||||||||||||||||||||||||||||||||||||||||||||||||||||
|
| Copyright © 2004-2025 "Delphi Sources" by BrokenByte Software. Delphi Programming Guide |
 |