|
|
|
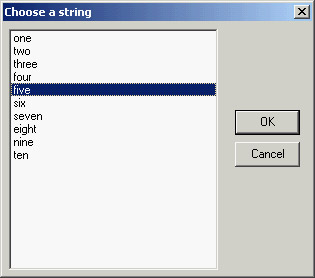
A Dialog Box in a ComponentThe next component we'll examine is completely different from those you have seen up to now. After building window-based controls and graphic components, I'll now show you how to build a nonvisual component. The basic idea is that forms are components. When you have built a form that might be particularly useful in multiple projects, you can add it to the Object Repository or make a component out of it. The second approach is more complex than the first, but it makes using the new form easier and allows you to distribute the form without its source code. As an example, I'll build a component based on a custom dialog box, trying to mimic as much as possible the behavior of standard Delphi dialog box components. The first step in building a dialog box in a component is to write the code for the dialog box itself, using the standard Delphi approach. Just define a new form and work on it as usual. When a component is based on a form, you can almost visually design the component. Of course, once the dialog box has been built, you have to define a component around it in a nonvisual way. The standard dialog box in this example is based on a list box, because it is common to let a user choose a value from a list of strings. I've customized this common behavior in a dialog box and then used it to build a component. The ListBoxForm form has a list box and the typical OK and Cancel buttons, as shown in its textual description:
object MdListBoxForm: TMdListBoxForm
  BorderStyle = bsDialog
  Caption = 'ListBoxForm'
  object ListBox1: TListBox
    OnDblClick = ListBox1DblClick
  end
  object BitBtn1: TBitBtn
    Kind = bkOK
  end
  object BitBtn2: TBitBtn
    Kind = bkCancel
  end
end
The only method of this dialog box form relates to the list box's double-click event, which closes the dialog box as though the user clicked the OK button, by setting the ModalResult property of the form to mrOk. Once the form works, you can begin changing its source code, adding the definition of a component and removing the declaration of the global variable for the form.
The most important operation is the definition of the TMdListBoxDialog component. This component is defined as nonvisual because its immediate ancestor class is TComponent. The component has one public property and these three published properties:
The public property is SelItem, a read-only property that automatically retrieves the selected element of the list of strings. Notice that this property has no storage and no data; it accesses other properties, providing a virtual representation of data:
type
  TMdListBoxDialog = class (TComponent)
  private
    FLines: TStrings;
    FSelected: Integer;
    FTitle: string;
    function GetSelItem: string;
    procedure SetLines (Value: TStrings);
    function GetLines: TStrings;
  public
    constructor Create(AOwner: TComponent); override;
    destructor Destroy; override;
    function Execute: Boolean;
    property SelItem: string read GetSelItem;
  published
    property Lines: TStrings read GetLines write SetLines;
    property Selected: Integer read FSelected write FSelected;
    property Title: string read FTitle write FTitle;
  end;
Most of this example's code is in the Execute method, a function that returns True or False depending on the modal result of the dialog box. This is consistent with the Execute method of most standard Delphi dialog box components. The Execute function creates the form dynamically, sets some of its values using the component's properties, shows the dialog box, and, if the result is correct, updates the current selection:
function TMdListBoxDialog.Execute: Boolean;
var
  ListBoxForm: TListBoxForm;
begin
  if FLines.Count = 0 then
    raise EStringListError.Create ('No items in the list');
  ListBoxForm := TListBoxForm.Create (Self);
  try
    ListBoxForm.ListBox1.Items := FLines;
    ListBoxForm.ListBox1.ItemIndex := FSelected;
    ListBoxForm.Caption := FTitle;
    if ListBoxForm.ShowModal = mrOk then
    begin
      Result := True;
      Selected := ListBoxForm.ListBox1.ItemIndex;
    end
    else
      Result := False;
  finally
    ListBoxForm.Free;
  end;
end;
Notice that the code is contained within a try/finally block, so if a run-time error occurs when the dialog box is displayed, the form will be destroyed anyway. I've also used exceptions to raise an error if the list is empty when a user runs it. This error is by design, and using an exception is a good technique to enforce it. The component's other methods are straightforward. The constructor creates the FLines string list, which is deleted by the destructor; the GetLines and SetLines methods operate on the string list as a whole; and the GetSelItem function (which follows) returns the text of the selected item:
function TMdListBoxDialog.GetSelItem: string;
begin
  if (Selected >= 0) and (Selected < FLines.Count) then
    Result := FLines [Selected]
  else
    Result := '';
end;
Of course, because you are manually writing the component code and adding it to the original form's source code, you have to remember to write the Register procedure. Once you've written the Register procedure and the component is ready, you must provide a bitmap. For nonvisual components, bitmaps are very important because they are used not only for the Component Palette, but also when you place the component on a form. Using the Nonvisual ComponentI've written a project to test the component once the bitmap has been prepared and the component has been installed. The form of this test program has a button, an edit box, and the MdListDialog component. In the program, I've added only a few lines of code, corresponding to the button's OnClick event:
procedure TForm1.Button1Click(Sender: TObject);
begin
  // select the text of the edit, if corresponding to one of the strings
  MdListDialog1.Selected := MdListDialog1.Lines.IndexOf (Edit1.Text);
  // run the dialog and get the result
  if MdListDialog1.Execute then
    Edit1.Text := MdListDialog1.SelItem;
end;
That's all the code you need to run the dialog box placed in the component, as you can see in Figure 9.10. As you've seen, this is an interesting approach to the development of some common dialog boxes. |
|
||||||||||||||||||||||||||||||||||||||||||||||||||||||||||||||||||||||||||||||||||||||||||||||||||||||||||||||||||||||||||||||||||||||||||||||||||||||||||||||||||||||||||||||||||||||||
|
| Copyright © 2004-2024 "Delphi Sources" by BrokenByte Software. Delphi Programming Guide |
   |