|
|
|
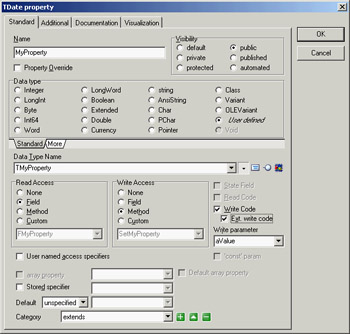
Coding Features of ModelMakerAs you've seen, ModelMaker is a powerful UML diagramming tool, and you can do a great deal of analysis and design work exercising only those capabilities; but, as I'll explain in the following sections, ModelMaker offers a great deal more than just diagramming. Many developers use ModelMaker as their primary development environment, supplanting Delphi in that regard. This is due in part to the visual way in which ModelMaker represents Delphi programming tasks, automating many of the repetitive parts of coding Delphi classes. But it is also because Delphi, for all its strengths, tends to facilitate the development of code where the line between the presentation domain and problem domain is blurred. In other words, it is easy to write application implementation code—the code that actually does stuff—and put it right in the event handlers of your forms. This is typically not considered good object-oriented design. On the other hand, ModelMaker facilitates the creation and refactoring of problem domain objects, and the de-coupling of those objects from the user interface. Before we get to these topics, though, I'll first discuss how Delphi and ModelMaker work together. Delphi/ModelMaker IntegrationWhen properly installed, ModelMaker adds a menu to the Delphi IDE, appropriately labeled ModelMaker: 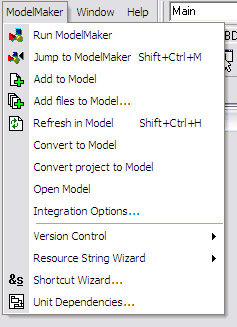 If you don't see this menu, you need to install ModelMaker's DLL-based wizard in the Delphi registry, as covered in the sidebar "Installing New DLL Wizards" at the end of Chapter 1. From this menu, you can control ModelMaker somewhat and quickly import your code into ModelMaker projects. Most of the menu options are available only if ModelMaker is running. Once you start ModelMaker (either from the Run ModelMaker menu item or in the normal fashion), the other items will become available. The integration menu contains a number of ways to add your code to a model. The Add to Model, Add Files to Model, Convert to Model, and Convert Project to Model items cause ModelMaker to import the specified units: The Add items import units into the currently loaded model in ModelMaker, and the Convert items create a new model and import the units into it. Convert Project to Model is a great place to begin—make sure you back up your code, and then select this menu item while one of your projects is open in Delphi. The entire project will be imported into a new model in ModelMaker. Upon examining your newly imported code in ModelMaker, you may notice that only the units that are part of the project were imported. ModelMaker won't automatically import units that are "used" by your project—doing so would create inordinately large models with many unnecessarily imported classes. However, many of ModelMaker's nicer inheritance-related features require that ancestor classes exist in the code model. (For instance, when properly set up, changes to ancestor classes will automatically propagate down to overriding descendants.) Fortunately, you have many options when importing code. Although you can import via the ModelMaker integration menu in Delphi (or by dragging a unit from Windows Explorer into ModelMaker), the more flexible way is to use one of the Import buttons on ModelMaker's main toolbar. Importing units this way opens the Import Source File dialog, where you can set options for how to import the code. Taking advantage of these options lets you import part of the VCL as placeholder classes so that you can leverage ModelMaker's inheritance tools without bloating your model. Also in the integration menu is Refresh in Model, which forces ModelMaker to re-import the current unit. This is a good time to discuss one of the consequences of ModelMaker's internal code model that I mentioned earlier. Because ModelMaker operates on its internal model and not on your external source code files (until you regenerate the files), it is common to find that both your model and your source code files have been edited—the result being that your model is now out of synch with the source files. When the source files have changed but not the model, you can re-synch the model by re-importing the source units. But if both the model and source files have been changed, the situation is more complicated. Fortunately, ModelMaker offers a robust set of tools to handle synchronization problems. See the section "The Difference View" for more information. Another item of note in the integration menu is Jump to ModelMaker. When you select this item, ModelMaker attempts to find the current code position within its loaded model, bringing ModelMaker to the front in the process. Although ModelMaker can be controlled from Delphi, the integration is two-way. Similar to the ModelMaker menu in the Delphi IDE, a Delphi menu appears in ModelMaker. In that menu are commands that let you jump from the currently selected model element to its corresponding position in the source code file in Delphi, as well as commands that cause Delphi to perform a syntax check, a compile, or a build. Thus you can edit your code, generate it, and compile it, all from within ModelMaker. Managing the Code ModelIt's time to discuss the nuts and bolts of coding within ModelMaker. Due to the objectified nature of ModelMaker's internal code model, editing code model elements is typically a more visual process than it is in Delphi. Editing a class property, for instance, is done via the Property Editor dialog, as you can see in Figure 11.6. Here is one of the best examples of ModelMaker's automation. When you add a new property, you don't have to worry about all the overhead of also adding a private state field, any read or write methods, or even the property's declaration. All you do is choose the appropriate settings in the editor, and ModelMaker creates the necessary supporting class members. This is more extended than the similar benefits offered in the Delphi IDE by Class Completion. Notice that the attributes of a property that you might normally type in by hand are represented by various controls in the dialog. Visibility, Type, Read and Write specifications, and so on are all managed in the editor. The benefits are in the area of refactoring (not to mention the elimination of certain repetitive typing tasks). For instance, because ModelMaker manages a property as an object in its code model, changing something about the property—its type, for instance—will cause ModelMaker to apply that change to any references of which it is aware. If later you want to change the read access from a field to a method, you can make that change in the editor, and ModelMaker will take care of adding the get method and changing the property's declaration. Best of all, if you decide to rename the property or move it to another class, the property owns its supporting class members: They will be automatically renamed or moved as appropriate. The same approach is used for each of the class member types; similar editors exist for methods, events, fields, and even method resolution clauses. There's a developer-level sense of abstraction to developing in ModelMaker. It decouples you from the need to think about implementation details when editing class members; you need merely think in terms of interface, while ModelMaker handles most of the repetitive parts of implementing the member. (Don't confuse my metaphor with writing the code of a method implementation—you'll still need to do that.) The Unit Code EditorModelMaker includes two code editors: the editor for implementing class methods, which I'll discuss next, and the Unit Code Editor, which requires some explanation. ModelMaker really is a class/object oriented tool—its conveniences are mostly built around managing class-level code. When it comes to code that is not part of a class (non-class type declarations, metaclass declarations, unit methods and variables, and so on), ModelMaker takes a more no-frills approach. When ModelMaker imports a unit, anything that can be stored within the code model is handled accordingly, and what's left over appears in the Unit Code Editor. (Often, for new users, this includes any documentation not residing within method implementations—but ModelMaker can reverse-engineer your documentation as well; more on that later.) The following is an example of what you might see in the Unit Code Editor:
unit <!UnitName!>;

interface

uses
  SysUtils, Windows, Messages, Classes, Graphics, Controls,
  Forms, Dialogs, Dates, StdCtrls;

type
MMWIN:CLASSINTERFACE TDateForm; ID=37;
var
  DateForm: TDateForm;

implementation

{$R *.DFM}

MMWIN:CLASSIMPLEMENTATION TDateForm; ID=37;
end.
Although this code looks vaguely familiar to a Delphi programmer, it obviously will not compile. You're looking at the shell that ModelMaker's code generation engine will use when expanding or generating a unit of code. When ModelMaker generates a unit, it starts at the top of this code and begins emitting lines of text while looking for one of three things: plain text, macros, or code-generation tags. Plain text, in this example, can be found in the very first line: unit. ModelMaker will emit this text exactly as is. The next token on that line is a macro, <!UnitName!>. I'll discuss macros in depth later; for now, understand that ModelMaker will expand the macro in-place. In this case, the macro represents the name of the unit, and that text will be emitted. Finally, an example of a code-generation tag appears directly under the type keyword: MMWIN:CLASSINTERFACE TDateForm; ID=37; In this case, the tag tells ModelMaker to expand the class interface for TDateForm at this point in the unit code. Thus, when editing code in the Unit Code Editor, you are looking at a hybrid of code managed by you and code managed by ModelMaker. Take care when editing this code not to disturb the ModelMaker-managed code unless you know what you're doing. It's analogous to editing code in a Delphi-managed DPR file—you can get in trouble fast if you're not careful. Nevertheless, this is where you would add a non-class-type declaration (an enumerated type, for instance). You would handle it just as you would in Delphi, adding the type declaration into the type section of the unit:
unit <!UnitName!>;

interface

uses
  SysUtils, Windows, Messages, Classes, Graphics, Controls,
  Forms, Dialogs, Dates, StdCtrls;

type
  TmyWeekday = (wdSunday, wdMonday, wdTuesday, wdWednesday,
      wdThursday, wdFriday, wdSaturday);

MMWIN:CLASSINTERFACE TDateForm; ID=37;
var
  DateForm: TDateForm;

implementation

{$R *.DFM}

MMWIN:CLASSIMPLEMENTATION TDateForm; ID=37;
end.
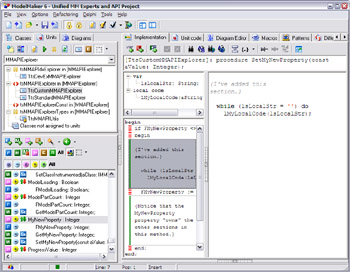
In this example, ModelMaker will emit the type declaration just as you've entered it—as plain text—and then begin expanding the TDateForm class declaration. ModelMaker offers tools within the Unit Code Editor for managing unit-level methods, and they are a significant convenience when you have large routine library-type units. However, now that you're using ModelMaker, you can leverage its strong refactoring features to objectify some of those routines. The Method Implementation Code EditorModelMaker's Method Implementation Code Editor (see Figure 11.7) is quite different from the Unit Code Editor. The editor takes up the right two thirds of the screen. In this example, I've added a fictional property named MyNewProperty and allowed ModelMaker to generate the state field and the read and write access methods. The write access method is active in the editor. Next to the code editor on the right you can see two interesting windows. The tree view on top is the local code explorer: Here you can manage local variables and local procedures. Below that is the Section List; ModelMaker allows you to break up code within a method implementation into sections. In part, this is an organizational convenience; but more importantly, it allows ModelMaker to control specific sections of code. Just as ModelMaker can own parts of the model (like a property access method automatically generated for a property), it can also own sections of code within a method. Most often this occurs when you have chosen to have ModelMaker generate the read or write code within a property access method. Notice that in this example, the first, third, and fifth sections have a red and white dashed left margin, indicating that they are owned by ModelMaker. The sections with the green margin are user-owned. When ModelMaker generates this method, the code will be emitted in the order shown, one section after another.
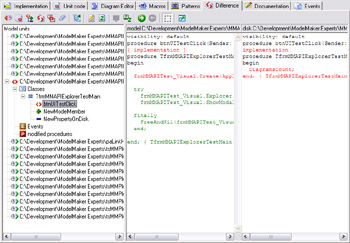
The Difference ViewAs I mentioned earlier, it's easy to get into a situation where your model is out of synch with your source files. If both your model and your source files have been edited, you can't simply regenerate the files from the model, lest you overwrite the source file changes. Likewise, you can't re-import the units, for fear of eliminating the changes to the model. Fortunately, ModelMaker offers one of the most robust differencing tools I've seen. When you find your model out of synch, it's time to visit the Difference tab (see Figure 11.8). ModelMaker offers a variety of ways to view differences. You can view a standard text file comparison, time stamp differences, or even a comparison of two selected classes within the model. My favorite is on display in Figure 11.8—a structured difference. ModelMaker temporarily imports the source file on disk (thereby objectifying it just like the internal code model) and compares the imported file with the same unit and classes in the model on an object and attribute level rather than as text. The result is a much faster, much more accurate comparison. Notice in the tree view in Figure 11.8 the icons that denote differences. The red <> indicates that both the model and the source file contain the indicated class member (btnUITestClick in the example) but the two instances differ. The differing code is displayed in the memo controls to the right. The green + in the tree view indicates that the indicated class member exists only in the model, not on the disk. The blue – indicates that the class member exists only on disk, not in the model. With this information, you can choose how to proceed in re-synchronizing your model. One nifty feature is the ability to re-import a selected method (rather than the whole unit) from within the Difference view. This approach implies that it is very important to know when your model is out of synch, so you don't override your changes on disk when regenerating the source files. Fortunately, ModelMaker offers several safeguards that can prevent this situation. One of these is a Design Critic (see the "Little-Known Tidbits" section later in the chapter). If your Design Critics are enabled, ModelMaker's Message View will warn you when a file on disk has changed: 
The Event Types ViewModelMaker enables the management of event types on the Events tab; there you can edit event type declarations. But keep in mind that although a new event type may exist in ModelMaker's internal code model, it does not exist in a source file until you add the event type's declaration to a unit. The easiest way to manage that process is to drag the event type declaration from the Events view list to the Unit list and drop the item into a unit. |
|
|||||||||||||||||||||||||||||||||||||||||||||||||||||||||||||||||||||||||||||||||||||||||||||||||||||||||||||||||||||||||||||||||||||||||||||||||||||||||||||||||||||||||||||||||||||||||||
|
| Copyright © 2004-2025 "Delphi Sources" by BrokenByte Software. Delphi Programming Guide |
 |