|
|
|
Advanced RaveIn this long introduction to Rave, you've seen that this reporting system is so complex I could devote an entire book to it. I've already built a couple of examples, and I could continue by showing a master/detail relationship or other reports with a complex structure. However, with the wizards available and the information provided so far, you should be able to build similar examples yourself. So, in this section I'll build only one example of this type, and then provide information about a few relevant features of Rave that aren't easy to understand by trial and error.
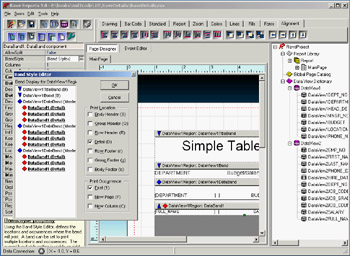
Master/Detail ReportsTo create a master/detail report in Rave, you need two datasets in the corresponding Delphi application, but these datasets don't need to have a master/detail relationship defined in the program—the report can define such a relationship. In the RaveDetails demo program, each of the two datasets is exposed through a Rave connection: object dsDepartments: TSimpleDataSet Connection = SQLConnection1 DataSet.CommandText = 'select * from DEPARTMENT' end object dsEmployee: TSimpleDataSet Connection = SQLConnection1 DataSet.CommandText = 'select * from EMPLOYEE' end object RvConnectionDepartments: TRvDataSetConnection DataSet = dsDepartments end object RvConnectionEmployee: TRvDataSetConnection DataSet = dsEmployee end The report has two corresponding data views, each connected to a DataBand component (both hosted within a Region). The first DataBand, used for the main dataset, has no special settings. The secondary DataBand defines the master/detail relationship using a few properties. The MasterDataView property refers to the data view of the master dataset, and the MasterKey and DetailKey properties refer to the fields that define the join (in this case, they both refer to the field DEPT_NO). The ControllerBand property refers to the DataBand showing the data of the master dataset. In case master/details report, the most important settings are managed by the Band Style Editor, where you must set the band as a detail. You can see this editor for the RaveDetails example in Figure 18.6. The master data view's KeepRowTogether property is set to True, to avoid having details end up in a different page than the master.
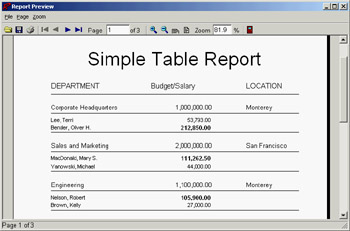
Scripting ReportsAt the beginning of this chapter I mentioned the Event Editor window of the Rave Designer, but so far I haven't used it. This tool is used to write code (scripts) within a report, responding to events of the various components as you'd do in Delphi. Writing scripts in the Rave Designer allows you to customize, or fine-tune, the output of a report in sophisticated ways. The language Rave uses for the scripts is Pascal based and a variation of the Delphi language, so you should be able to pick it up easily. The RaveDetails example shows in bold font salaries that are greater than a specified amount. The obvious way to accomplish this is to write scripting code to be executed for each instance of the detail band—that is, for each record in the employee database. Instead of modifying the Font property directly, I decided to add two different FontManager components to the report page and name them to make their role understandable: fmPlainFont and fmBoldFont. You can open the report to see their properties and layout. In the report, to highlight values outside a given range, you handle the DataText component's BeforePrint event. To do so, move to the Event Editor page, choose the DataText component connected to the Salary field, and select the event. In the event's code editor window, write the following code: if DataView2Salary.AsFloat > 100000 then self.FontMirror := fmBoldFont; else self.FontMirror := fmPlainFont; end if; The script changes the FontMirror property of the current object (self) to refer to one of the two FontManager components on the page, depending on the field value. Notice that DataView2Salary is a reference to one of the fields of the data view—the one connected to the current DataText component. Compile the script and run the report to see its effect, shown in Figure 18.7.
MirroringReporting templates can contain one or more components and can be reused via Rave's mirroring technology. The DataMirrorSection component mirrors other Sections based on the contents of a DataField. The use of mirroring sections allows the DataMirrorSection to be very flexible. Remember that Sections can contain any other component including graphics, regions, text, and so on. For example, you could use a DataMirrorSection component to make a single report produce different envelope formats for international or U.S. addresses. The template for international customers could include a line for the country have the text centered on the envelope, whereas the U.S. format would not include the country line would offset the text to the right of center and lower on the envelope. Normally, one of the settings will be defined as the default. If a default is not defined and the field value does not match any of the other settings, then the format used will be the normal contents of the DataMirrorSection component. Calculations to the MaxIn addition to the simple CalcText component discussed earlier, the Rave Designer includes three components for handling more complex situations: CalcTotal, CalcController, and CalcOp. CalcTotalThe CalcTotal is a non-visual version of the CalcText component. When this component is printed, its value is typically stored in a project parameter (defined by the DestParam property) and formatted according to the DisplayFormat property. It can be useful when you're performing totaling calculations that will be used by other calculations before being printed. If the value of the CalcTotal will only be used by other calculation components, such as CalcOp, you should leave the DestParam property blank. CalcControllerCalcController is a non-visual component that acts as a controller for CalcText and CalcTotal components through their Controller properties. When the controller component is printed, it signals all calculation components that it controls to perform their operation. This process allows a report to recalculate totals on group bands, detail bands, or whole pages depending upon the location of the CalcController component. The CalcController component can also initialize a CalcText or CalcTotal component to a specific value (through the InitCalcVar, InitDataField, and InitValue properties). The CalcController component will initialize values only if it is used in the Initializer property of CalcText or CalcTotal components. CalcOpCalcOp is a non-visual component that allows an operation (defined by the Operator property) to be performed on values from different data sources. The result can then be saved in a project parameter like CalcTotal, as indicated by the DestParam and DisplayFormat properties. For example, suppose you need to add two DataText components, as in A + B = C (where A and B represent the two DataText component values and C represents the result stored in a project parameter). The three source types have many different values associated with them. The calculation can start with different types of data sources:
After choosing the data sources, you select the operation to be used between them. The Operator property has a drop-down menu you can use to make the appropriate choice. In the example A + B = C, the operator is coAdd. Sometimes a function needs to be performed on a value before it is processed with the second value. In this case the source's Function property is handy. With a function, you can converted a value (such as hours to minutes), compute a trigonometric function (like the sin of the value), or perform many others calculations (such as a square root or absolute value). Just as it is important to do the calculations in order, it is important to make sure the components are in order in the Project Tree. A report executes components down the Project Tree. For CalcOp components or any calculation component, this means they must be in the correct order. It is also important to note that if a source value is dependent on any other components (like other CalcOp components or DataText components), those components must come first in the Project Tree. |
|
|||||||||||||||||||||||||||||||||||||||||||||||||||||||||||||||||||||||||||||||||||||||||||||||||||||||||||||||||||||||||||||||||||||||||||||||||||||||||||||||||||||||||||||||||||||||||||||||||
|
| Copyright © 2004-2024 "Delphi Sources" by BrokenByte Software. Delphi Programming Guide |
   |