|
|
|
Toolbar ContainersMost modern applications have multiple toolbars, generally hosted by a specific container. Microsoft Internet Explorer, the various standard business applications, and the Delphi IDE all use this general approach. However, they each implement it differently. Delphi has two ready-to-use toolbar containers:
Both components can host toolbar controls as well as some extra elements such as combo boxes and other controls. A toolbar can also replace the menu of an application, as you'll see later. Because the CoolBar component is not frequently used in Delphi applications, it is covered in the sidebar "A Really Cool Toolbar"; the emphasis in the following sections is on Delphi's ControlBar. The Win32 CoolBar common control is basically a collection of TCoolBand objects that you can activate by using the editor of the Bands property, available also in the component editor menu items or through the Object TreeView. You can customize the CoolBar component in many ways. You can set a bitmap for its background, add some bands to the Bands collection, and then assign an existing component or component container to each band. You can use any window-based control (not graphic controls), but only some of them will show up properly. If you want to have a bitmap on the background of the CoolBar, for example, you need to use partially transparent controls. The typical component used in a CoolBar is the Toolbar, but combo boxes, edit boxes, and animation controls are also quite common. 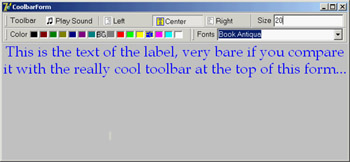
You can place one band on each line or all of them on the same line. Each would use a part of the available surface, and it would be automatically enlarged when the user clicks on its title. It is easier to use this component than to explain it. Try it yourself or open the CoolDemo example: The CoolDemo example's form has a TCoolBar component with four bands, two for each of the two lines. The first band includes a subset of the toolbar of the previous example, this time adding an ImageList for the highlighted images. The second has an edit box used to set the font of the text; the third has a ColorGrid component, used to choose the font color and background color. The last band has a ComboBox control with the available fonts. The user interface of the CoolBar component is nice, and Microsoft uses it in its applications, but alternatives such as the ControlBar component offer a similar UI with no troubles attached. The Windows CoolBar control has had many different and incompatible versions, because Microsoft has released different versions of the common control library with different versions of the Internet Explorer. Some of these versions "broke" existing programs built with Delphi—a very good reason for not using it now even if it is more stable. The ControlBarThe ControlBar is a control container, and you build it by placing other controls inside it, as you do with a panel (there is no list of Bands in it). Every control placed in the bar gets its own dragging area or grabber (a small panel with two vertical lines, on the left of the control), even a stand-alone button: 
For this reason, you should generally avoid placing specific buttons inside the ControlBar, but instead add containers with buttons inside them. Rather than using a panel, you should use one ToolBar control for every section of the ControlBar. The MdEdit2 example is another version of the demo I developed to discuss the ActionList component earlier in this chapter. I've grouped the buttons into three toolbars (instead of a single one) and left the two combo boxes as stand-alone controls. All these components are inside a ControlBar so a user can arrange them at runtime, as you can see in Figure 6.12. 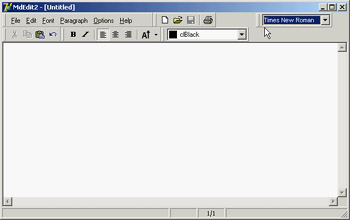
Figure 6.12: The MdEdit2 example at run time, while a user is rearranging the toolbars in the control bar The following snippet of the DFM listing of the MdEdit2 example shows how the various toolbars and controls are embedded in the ControlBar component:
object ControlBar1: TControlBar
  Align = alTop
  AutoSize = True
  ShowHint = True
  PopupMenu = BarMenu
  object ToolBarFile: TToolBar
    Flat = True
    Images = Images
    Wrapable = False
    object ToolButton1: TToolButton
      Action = acNew
    end
    // more buttons...
  end
  object ToolBarEdit: TToolBar...
  object ToolBarFont: TToolBar...
  object ToolBarMenu: TToolBar
    AutoSize = True
    Flat = True
    Menu = MainMenu
  end
  object ComboFont: TComboBox
    Hint = 'Font Family'
    Style = csDropDownList
    OnClick = ComboFontClick
  end
  object ColorBox1: TColorBox...
end
To obtain the standard effect, you have to disable the edges of the toolbar controls and set their style to flat. Sizing all the controls alike, so that you obtain one or two rows of elements of the same height, is not as easy as it might seem at first. Some controls have automatic sizing or various constraints. In particular, to make the combo box the same height as the toolbars, you have to tweak the type and size of its font. Resizing the control itself has no effect. The ControlBar also has a shortcut menu that allows you to show or hide each of the controls currently inside it. Instead of writing code specific to this example, I've implemented a more generic (and reusable) solution. The shortcut menu, called BarMenu, is empty at design time and is populated when the program starts:
procedure TFormRichNote.FormCreate(Sender: TObject);
var
  I: Integer;
  mItem: TMenuItem;
begin
  ...
  // populate the control bar menu
  for I := 0 to ControlBar.ControlCount - 1 do
  begin
    mItem := TMenuItem.Create (Self);
    mItem.Caption := ControlBar.Controls [I].Name;
    mItem.Tag := Integer (ControlBar.Controls [I]);
    mItem.OnClick := BarMenuClick;
    BarMenu.Items.Add (mItem);
  end;
The BarMenuClick procedure is a single event handler used by all the menu items; it uses the Tag property of the Sender menu item to refer to the element of the ControlBar associated with the item in the FormCreate method: procedure TFormRichNote.BarMenuClick(Sender: TObject); var aCtrl: TControl; begin aCtrl := TControl ((Sender as TComponent).Tag); aCtrl.Visible := not aCtrl.Visible; end; Finally, the OnPopup event of the menu is used to refresh the check mark of the menu items:
procedure TFormRichNote.BarMenuPopup(Sender: TObject);
var
  I: Integer;
begin
  // update the menu check marks
  for I := 0 to BarMenu.Items.Count - 1 do
    BarMenu.Items [I].Checked := TControl (BarMenu.Items [I].Tag).Visible;
end;
A Menu in a Control BarIf you look at the user interface of the MdEdit2 application in Figure 6.12, you'll notice that the form's menu appears inside a toolbar, hosted by the control bar, and below the application caption. All you have to do to accomplish this is set the toolbar's Menu property. You must also remove the main menu from the form's Menu property (keeping the MainMenu component on the form), to avoid having two copies of the menu on screen. Delphi's Docking SupportAnother feature available in Delphi is support for dockable toolbars and controls. In other words, you can create a toolbar and move it to any side of a form, or even move it freely on the screen, undocking it. However, setting up a program properly to obtain this effect is not as easy as it sounds. Delphi's docking support is connected with container controls, not only with forms. A panel, a ControlBar, and other containers (technically, any control derived from TWinControl) can be set up as dock targets by enabling their DockSite property. You can also set the AutoSize property of these containers, so they'll show up only if they hold a control. To be able to drag a control (an object of any TControl-derived class) into the dock site, simply set its DragKind property to dkDock and its DragMode property to dmAutomatic. This way, the control can be dragged away from its current position into a new docking container. To undock a component and move it to a special form, you can set its FloatingDockSiteClass property to TCustomDockForm (to use a predefined stand-alone form with a small caption). All the docking and undocking operations can be tracked by using special events of the component being dragged (OnStartDock and OnEndDock) and the component that will receive the docked control (OnDockOver and OnDockDrop). These docking events are very similar to the dragging events available in earlier versions of Delphi. There are also commands you can use to accomplish docking operations in code and to explore the status of a docking container. Every control can be moved to a different location using the Dock, ManualDock, and ManualFloat methods. A container has a DockClientCount property, indicating the number of docked controls, and a DockClients property, which is an array of these controls. Moreover, if the dock container has the UseDockManager property set to True, you'll be able to use the DockManager property, which implements the IDockManager interface. This interface has many features you can use to customize the behavior of a dock container, including support for streaming its status. As you can see from this brief description, docking support in Delphi is based on a large number of properties, events, and methods—more features than I have room to explore in detail. The next example introduces the main features you'll need.
Docking Toolbars in ControlBarsThe MdEdit2 example, already discussed, includes docking support. The program has a second ControlBar at the bottom of the form, which accepts dragging one of the toolbars in the ControlBar at the top. Because both toolbar containers have the AutoSize property set to True, they are automatically removed when the host contains no controls. I've also set the AutoDrag and AutoDock properties of both ControlBars to True. I had to place the bottom ControlBar inside a panel, together with the RichEdit control. Without this trick, the ControlBar, when activated and automatically resized, kept moving below the status bar, which isn't the correct behavior. In the example, the ControlBar is the only panel control aligned to the bottom, so there is no possible confusion. To let users drag the toolbars out of the original container, you once again (as stated previously) set their DragKind property to dkDock and their DragMode property to dmAutomatic. The only two exceptions are the menu toolbar, which I decided to keep close to the typical position of a menu bar, and the ColorBox control, because unlike the combo box this component doesn't expose the DragMode and DragKind properties. (In the example's FormCreate method, you'll find code you can use to activate docking for the component, based on the "protected hack" discussed in Chapter 2.) The Fonts combo box can be dragged, but I don't want to let a user dock it in the lower control bar. To implement this constraint, I've used the control bar's OnDockOver event handler, by accepting the docking operation only for toolbars: procedure TFormRichNote.ControlBarLowerDockOver(Sender: TObject; Source: TDragDockObject; X, Y: Integer; State: TDragState; var Accept: Boolean); begin Accept := Source.Control is TToolbar; end; When you move one of the toolbars outside of any container, Delphi automatically creates a floating form; you might be tempted to set it back by closing the floating form. This doesn't work, because the floating form is removed along with the toolbar it contains. However, you can use the shortcut menu of the topmost ControlBar, also attached to the other ControlBar, to show this hidden toolbar. The floating form created by Delphi to host undocked controls has a thin caption, the so-called toolbar caption, which by default has no text. For this reason, I've added some code to the OnEndDock event of each dockable control to set the caption of the newly created form into which the control is docked. To avoid a custom data structure for this information, I've used the text of the Hint property for these controls (which is basically not used) to provide a suitable caption:
procedure TFormRichNote.EndDock(Sender, Target: TObject; X, Y: Integer);
begin
  if Target is TCustomForm then
    TCustomForm(Target).Caption := GetShortHint((Sender as TControl).Hint);
end;
You can see an example of this effect in the MdEdit2 program in Figure 6.13. 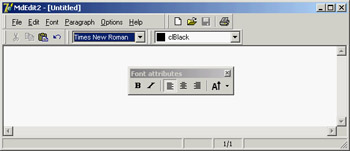
Figure 6.13: The MdEdit2 example allows you to dock the toolbars (but not the menu) at the top or bottom of the form or to leave them floating. Another extension of the example (which I haven't done) might add dock areas on the two sides of the form. The only extra effort this would require would be a routine to turn the toolbars vertically instead of horizontally. Doing so requires switching the Left and Top properties of each button after disabling the automatic sizing. Controlling Docking OperationsDelphi provides many events and methods that give you a lot of control over docking operations, including a dock manager. To explore some of these features, try the DockTest example, a test bed for docking operations shown in Figure 6.14. The program handles the OnDockOver and OnDockDrop events of a dock host panel to display messages to the user, such as the number of controls currently docked: procedure TForm1.Panel1DockDrop(Sender: TObject; Source: TDragDockObject; X, Y: Integer); begin Caption := 'Docked: ' + IntToStr (Panel1.DockClientCount); end; In the same way, the program handles the main form's docking events. The controls have a shortcut menu you can invoke to perform docking and undocking operations in code, without the usual mouse dragging, with code like this:
procedure TForm1.menuFloatPanelClick(Sender: TObject);
begin
  Panel2.ManualFloat (Rect (100, 100, 200, 300));
end;

procedure TForm1.Floating1Click(Sender: TObject);
var
  aCtrl: TControl;
begin
  aCtrl := Sender as TControl;
  // toggle the floating status
  if aCtrl.Floating then
    aCtrl.ManualDock (Panel1, nil, alBottom)
  else
    aCtrl.ManualFloat (Rect (100, 100, 200, 300));
end;
To make the program perform properly at startup, you must dock the controls to the main panel in the initial code; otherwise you can get a weird effect. Oddly enough, for the program to behave properly, you need to add controls to the dock manager and also dock them to the panel (one operation doesn't trigger the other automatically): // dock memo Memo1.Dock(Panel1, Rect (0, 0, 100, 100)); Panel1.DockManager.InsertControl(Memo1, alTop, Panel1); // dock listbox ListBox1.Dock(Panel1, Rect (0, 100, 100, 100)); Panel1.DockManager.InsertControl(ListBox1, alLeft, Panel1); // dock panel2 Panel2.Dock(Panel1, Rect (100, 0, 100, 100)); Panel1.DockManager.InsertControl(Panel2, alBottom, Panel1); The example's final feature is probably the most interesting and the most difficult to implement properly. Every time the program closes, it saves the current docking status of the panel, using the dock manager support. When the program is reopened, it reapplies the docking information, restoring the window's previous configuration. Here is the code you might think of writing for saving and loading:
procedure TForm1.FormDestroy(Sender: TObject);
var
  FileStr: TFileStream;
begin
  if Panel1.DockClientCount > 0 then
  begin
    FileStr := TFileStream.Create (DockFileName, fmCreate or fmOpenWrite);
    try
      Panel1.DockManager.SaveToStream (FileStr);
    finally
      FileStr.Free;
    end;
  end
  else
    // remove the file
    DeleteFile (DockFileName);
end;

procedure TForm1.FormCreate(Sender: TObject);
var
  FileStr: TFileStream;
begin
  // initialization code above...

  // reload the settings
  DockFileName := ExtractFilePath (Application.Exename) + 'dock.dck';
  if FileExists (DockFileName) then
  begin
    FileStr := TFileStream.Create (DockFileName, fmOpenRead);
    try
      Panel1.DockManager.LoadFromStream (FileStr);
    finally
      FileStr.Free;
    end;
  end;
  Panel1.DockManager.ResetBounds (True);
end;
This code works fine as long as all controls are initially docked. When you save the program, if one control is floating, you won't see it when you reload the settings. However, because of the initialization code inserted earlier, the control will be docked to the panel anyway, and will appear when you drag away the other controls. Needless to say, this is a messy situation. For this reason, after loading the settings, I added this further code:
for i := Panel1.DockClientCount - 1 downto 0 do
begin
  aCtrl := Panel1.DockClients[i];
  Panel1.DockManager.GetControlBounds(aCtrl, aRect);
  if (aRect.Bottom - aRect.Top <= 0) then
  begin
    aCtrl.ManualFloat (aCtrl.ClientRect);
    Panel1.DockManager.RemoveControl(aCtrl);
  end;
end;
The complete listing includes more commented code, which I used while developing this program; you might use it to understand what happens (which is often different from what you'd expect!). Briefly, the controls that have no size set in the dock manager (the only way I could figure out they are not docked) are shown in a floating window and are removed from the dock manager list. If you look at the complete code for the OnCreate event handler, you'll see a lot of complex code, just to get a plain behavior. You could add more features to a docking program, but to do so you should remove other features, because some of them might conflict. Adding a custom docking form breaks features of the dock manager. Automatic alignments don't work well with the docking manager's code for restoring the status. I suggest you take this program and explore its behavior, extending it to support the type of user interface you prefer.
Docking to a PageControlAnother interesting feature of page controls is their specific support for docking. As you dock a new control over a PageControl, a new page is automatically added to host it, as you can easily see in the Delphi environment. To accomplish this, you set the PageControl as a dock host and activate docking for the client controls. This technique works best when you have secondary forms you want to host. Moreover, if you want to be able to move the entire PageControl into a floating window and then dock it back, you'll need a docking panel in the main form. This is what I've done in the DockPage example, which has a main form with the following settings:
object Form1: TForm1
  Caption = 'Docking Pages'
  object Panel1: TPanel
    Align = alLeft
    DockSite = True
    OnMouseDown = Panel1MouseDown
    object PageControl1: TPageControl
      ActivePage = TabSheet1
      Align = alClient
      DockSite = True
      DragKind = dkDock
      object TabSheet1: TTabSheet
        Caption = 'List'
        object ListBox1: TListBox
          Align = alClient
        end
      end
    end
  end
  object Splitter1: TSplitter
    Cursor = crHSplit
  end
  object Memo1: TMemo
    Align = alClient
  end
end
Notice that the Panel has the UseDockManager property set to True and that the PageControl invariably hosts a page with a list box, because when you remove all the pages, the code used for automatic sizing of dock containers might cause you trouble. The program has two other forms with similar settings (although they host different controls):
object Form2: TForm2
  Caption = 'Small Editor'
  DragKind = dkDock
  DragMode = dmAutomatic
  object Memo1: TMemo
    Align = alClient
  end
end
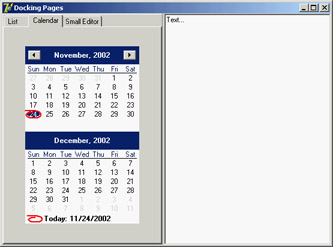
You can drag these forms onto the page control to add new pages to it, with captions corresponding with the form titles. You can also undock each of these controls and even the entire PageControl. The program doesn't enable automatic dragging, which would make it impossible to switch pages; instead, the feature is activated when the user clicks on the area of the PageControl that has no tabs—that is, on the underlying panel: procedure TForm1.Panel1MouseDown(Sender: TObject; Button: TMouseButton; Shift: TShiftState; X, Y: Integer); begin PageControl1.BeginDrag (False, 10); end; You can test this behavior by running the DockPage example, and Figure 6.15 tries to depict it. Notice that when you remove the PageControl from the main form, you cannot directly dock the other forms to the panel, as this is prevented by specific code within the program (simply because at times the behavior won't be correct). |
|
||||||||||||||||||||||||||||||||||||||||||||||||||||||||||||||||||||||||||||||||||||||||||||||||||||||||||||||||||||||||||||||||||||||||||||||||||||||||||||||||||||||||||||||||||||||||||||||
|