|
|
|
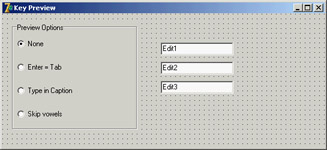
Direct Form InputHaving discussed some special capabilities of forms, I'll now move to a very important topic: user input in a form. If you decide to make limited use of components, you might write complex programs as well, receiving input from the mouse and the keyboard. In this chapter, I'll only introduce this topic. Supervising Keyboard InputGenerally, forms don't handle keyboard input directly. If a user has to type something, your form should include an edit component or one of the other input components. If you want to handle keyboard shortcuts, you can use those connected with menus (possibly using a hidden pop-up menu). At other times, however, you might want to handle keyboard input in particular ways for a specific purpose. In these cases, you can turn on the form's KeyPreview property. Then, even if you have some input controls, the form's OnKeyPress event will always be activated for any character-input operation (system and shortcut keys excluded). The keyboard input will then reach the destination component, unless you stop it in the form by setting the character value to zero (not the character 0, but the value 0 of the character set, a control character indicated as #0). The example I've built to demonstrate this approach, KPreview, has a form with no special properties (not even KeyPreview), a radio group with four options, and some edit boxes, as you can see in Figure 7.5. By default the program does nothing special, except when the various radio buttons are used to enable the key preview: procedure TForm1.RadioPreviewClick(Sender: TObject); begin KeyPreview := RadioPreview.ItemIndex <> 0; end; Now you'll begin receiving the OnKeyPress events, and you can do one of the three actions requested by the three special buttons in the radio group. The action depends on the value of the ItemIndex property of the radio group component. This is the reason the event handler is based on a case statement:
procedure TForm1.FormKeyPress(Sender: TObject; var Key: Char);
begin
  case RadioPreview.ItemIndex of
    ...
In the first case, if the value of the Key parameter is #13, which corresponds to the Enter key, you disable the operation (setting Key to zero) and then mimic the activation of the Tab key. You can do this many ways, but the technique I've chosen is quite particular. I send the CM_DialogKey message to the form, passing the code for the Tab key (VK_TAB): 1: // Enter = Tab
if Key = #13 then
begin
Key := #0;
Perform (CM_DialogKey, VK_TAB, 0);
end;
To type in the form's caption, the program adds the character to the current Caption. There are two special cases. When the Backspace key is pressed, the last character of the string is removed (by copying to the Caption all the characters of the current Caption but the last one). When the Enter key is pressed, the program stops the operation by resetting the ItemIndex property of the radio group control. Here is the code: 2: // type in caption
begin
if Key = #8 then // backspace: remove last char
Caption := Copy (Caption, 1, Length (Caption) - 1)
else if Key = #13 then // enter: stop operation
RadioPreview.ItemIndex := 0
else // anything else: add character
Caption := Caption + Key;
Key := #0;
end;
Finally, if the last radio item is selected, the code checks whether the character is a vowel (by testing for its inclusion in a constant "vowel set"). In this case, the character is skipped altogether: 3: // skip vowels if UpCase(Key) in ['A', 'E', 'I', 'O', 'U'] then Key := #0; Getting Mouse InputWhen a user clicks one of the mouse buttons over a form (or over a component), Windows sends the application messages. Delphi defines events you can use to write code that responds to these messages. The two basic events are OnMouseDown, received when a mouse button is clicked, and OnMouseUp, received when the button is released. Another fundamental system message is related to mouse movement: OnMouseMove. Although it should be easy to understand the meaning of the three messages—down, up, and move—you may wonder how they relate to the OnClick event you have often used up to now. You have used the OnClick event for components, but it is also available for the form. Its general meaning is that the left mouse button has been clicked and released on the same window or component. However, between these two actions, the cursor might have been moved outside the area of the window or component while the left mouse button was held down. Another difference between the OnMouseXX and OnClick events is that the latter relates only to the left mouse button. Most of the mouse types connected to a Windows PC have two mouse buttons, and some even have three. Usually you refer to these buttons as the left mouse button (generally used for selection), the right mouse button (for accessing shortcut menus), and the middle mouse button (seldom used). Nowadays most new mouse devices have a button wheel instead of the middle button; users typically use the wheel for scrolling (causing an OnMouseWheel event), but they can also press it (generating the OnMouseWheelDown and OnMouseWheelUp events). Mouse wheel events are automatically converted into scrolling events. A user should always be able to use any Windows application without the mouse. This is not an option; it is a Windows programming rule. Of course, an application might be easier to use with a mouse, but that should never be mandatory. Some users may not have a mouse connected, such as travelers with a small laptop and no space, workers in industrial environments, and bank clerks with other peripherals around. There is another reason to support the keyboard: Using the mouse is nice, but it tends to be slower. If you are a skilled touch typist, you won't use the mouse to drag a word of text; you'll use shortcut keys to copy and paste it without moving your hands from the keyboard. For these reasons, you should always set up a proper tab order for a form's components. Remember to add keys for buttons and menu items for keyboard selection, use shortcut keys on menu commands, and so on. The Parameters of the Mouse EventsAll the lower-level mouse events have the same parameters: the usual Sender parameter, a Button parameter indicating which of the three mouse buttons has been clicked (mbRight, mbLeft, or mbCenter), the Shift parameter indicating which of the mouse-related virtual keys (the shift-state modifiers Alt, Ctrl, and Shift, plus the three mouse buttons) was pressed when the event occurred; and the x and y coordinates of the position of the mouse in client area coordinates of the current window. Using this information, it is simple to draw a small circle in the position of a left mouse button–down event:
procedure TForm1.FormMouseDown(Sender: TObject;
  Button: TMouseButton; Shift: TShiftState; X, Y: Integer);
begin
  if Button = mbLeft then
    Canvas.Ellipse (X-10, Y-10, X+10, Y+10);
end;
Dragging and Drawing with the MouseTo demonstrate a few of the mouse techniques discussed so far, I've built an example based on a form without any components. The program is called MouseOne in the VCL version and QMouseOne in the CLX version. It displays the current position of the mouse in the form's Caption:
procedure TMouseForm.FormMouseMove(Sender: TObject; Shift: TShiftState;
  X, Y: Integer);
begin
  // display the position of the mouse in the caption
  Caption := Format ('Mouse in x=%d, y=%d', [X, Y]);
end;
You can use this feature of the program to better understand how the mouse works. Make this test: Run the program (this simple version or the complete one) and resize the windows on the desktop so that the form of the MouseOne or QMouseOne program is behind another window and inactive but with the title visible. Now move the mouse over the form, and you'll see that the coordinates change. This behavior means the OnMouseMove event is sent to the application even if its window is not active, and it proves what I have mentioned: Mouse messages are always directed to the window under the mouse. The only exception is the mouse capture operation I'll discuss in this same example. Besides showing the position in the title of the window, the MouseOne/QMouseOne example can track mouse movements by painting small pixels on the form if the user keeps the Shift key pressed (again, this direct painting code produces non-persistent output):
procedure TMouseForm.FormMouseMove(Sender: TObject; Shift: TShiftState;
  X, Y: Integer);
begin
  // display the position of the mouse in the caption
  Caption := Format ('Mouse in x=%d, y=%d', [X, Y]);
  if ssShift in Shift then
    // mark points in yellow
    Canvas.Pixels [X, Y] := clYellow;
end;
The most interesting feature of this example is its direct mouse-dragging support. Contrary to what you might think, Windows has no system support for dragging, which is implemented in VCL by means of lower-level mouse events and operations. (I discussed an example of dragging from one control to another in Chapter 6.) In VCL, forms cannot originate dragging operations, so in this case you are obliged to use the low-level approach. The aim of this example is to draw a rectangle from the initial position of the dragging operation to the final one, giving users visual clues about the operation they are doing. The idea behind dragging is quite simple. The program receives a sequence of button-down, mouse-move, and button-up messages. When the button is pressed, dragging begins, although the real actions take place only when the user moves the mouse (without releasing the mouse button) and when dragging terminates (when the button-up message arrives). The problem with this basic approach is that it is not reliable. A window usually receives mouse events only when the mouse is over its client area; so if the user presses the mouse button, moves the mouse onto another window, and then releases the button, the second window will receive the button-up message. There are two solutions to this problem. One (seldom used) is mouse clipping. Using a Windows API function (ClipCursor), you can force the mouse not to leave a certain area of the screen. When you try to move it outside the specified area, it stumbles against an invisible barrier. The second and more common solution is to capture the mouse. When a window captures the mouse, all the subsequent mouse input is sent to that window. This is the approach I've used for the MouseOne/QMouseOne example. The example's code is built around three methods: FormMouseDown, FormMouseMove, and FormMouseUp. Clicking the left mouse button over the form starts the process, setting the fDragging Boolean field of the form (which indicates that dragging is in action in the other two methods). The method also uses a TRect variable that keeps track of the initial and current position of the dragging. Here is the code:
procedure TMouseForm.FormMouseDown(Sender: TObject; Button: TMouseButton;
  Shift: TShiftState; X, Y: Integer);
begin
  if Button = mbLeft then
  begin
    fDragging := True;
    Mouse.Capture := Handle;
    fRect.Left := X;
    fRect.Top := Y;
    fRect.BottomRight := fRect.TopLeft;
    dragStart := fRect.TopLeft;
    Canvas.DrawFocusRect (fRect);
  end;
end;
An important action of this method is the call to the SetCapture API function, obtained by setting the Capture property of the global object Mouse. Now, even if a user moves the mouse outside the client area, the form still receives all mouse-related messages. You can see that behavior by moving the mouse toward the upper-left corner of the screen; the program shows negative coordinates in the caption.
When dragging is active and the user moves the mouse, the program draws a dotted rectangle corresponding to the mouse's position. The program calls the DrawFocusRect method twice. The first time this method is called, it deletes the current image, thanks to the fact that two consecutive calls to DrawFocusRect reset the original situation. After updating the position of the rectangle, the program calls the method a second time:
procedure TMouseForm.FormMouseMove(Sender: TObject; Shift: TShiftState;
  X, Y: Integer);
begin
  // display the position of the mouse in the caption
  Caption := Format ('Mouse in x=%d, y=%d', [X, Y]);
  if fDragging then
  begin
    // remove and redraw the dragging rectangle
    Canvas.DrawFocusRect (fRect);
    if X > dragStart.X then
      fRect.Right := X
    else
      fRect.Left := X;
    if Y > dragStart.Y then
      fRect.Bottom := Y
    else
      fRect.Top := Y;
    Canvas.DrawFocusRect (fRect);
  end
  else
    if ssShift in Shift then
      // mark points in yellow
      Canvas.Pixels [X, Y] := clYellow;
end;
On Windows 2000 (and other versions) the DrawFocusRect function doesn't draw rectangles with a negative size, so the code of the program has been fixed (as you can see above) by comparing the current position with the initial position of the dragging, saved in the dragStart point. When the mouse button is released, the program terminates the dragging operation by resetting the Capture property of the Mouse object (which internally calls the ReleaseCapture API function) and by setting the value of the fDragging field to False:
procedure TMouseForm.FormMouseUp(Sender: TObject; Button: TMouseButton;
  Shift: TShiftState; X, Y: Integer);
begin
  if fDragging then
  begin
    Mouse.Capture := 0; // calls ReleaseCapture
    fDragging := False;
    Invalidate;
  end;
end;
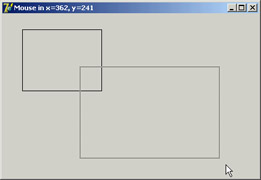
The final call, Invalidate, triggers a painting operation and executes the following OnPaint event handler: procedure TMouseForm.FormPaint(Sender: TObject); begin Canvas.Rectangle (fRect.Left, fRect.Top, fRect.Right, fRect.Bottom); end; This makes the output of the form persistent, even if you hide it behind another form. Figure 7.6 shows a previous version of the rectangle and a dragging operation in action. |
|
||||||||||||||||||||||||||||||||||||||||||||||||||||||||||||||||||||||||||||||||||||||||||||||||||||||||||||||||||||||||||||||||||||||||||||||||||||||||||||||||||||||||||||||||||||||||||||||||||||
|