|
|
|
Position, Size, Scrolling, and ScalingOnce you have designed a form in Delphi, you run the program, and you expect the form to show up exactly as you prepared it. However, a user of your application might have a different screen resolution or might want to resize the form (if this is possible, depending on the border style), eventually affecting the user interface. I've already discussed (mainly in Chapter 7) some techniques related to controls, such as alignment and anchors. Here I'll specifically address elements related to the form as a whole. Besides differences in the user system, there are many reasons to change Delphi defaults in this area. For example, you might want to run two copies of the program and avoid having all the forms show up in exactly the same place. I've collected many other related elements, including form scrolling, in this portion of the chapter. The Form PositionYou can use a few properties to set the position of a form. The Position property indicates how Delphi determines the initial position of the form. The default poDesigned value indicates that the form will appear where you designed it and where you use the positional (Left and Top) and size (Width and Height) properties of the form. Some of the other choices (poDefault, poDefaultPosOnly, and poDefaultSizeOnly) depend on an operating system feature: Using a specific flag, Windows can position and/ or size new windows using a cascade layout. In this way, the positional and size properties you set at design time will be ignored, but if the user runs the application twice the windows won't overlap. The default positions are ignored when the form has a dialog border style. The poScreenCenter value displays the form in the center of the screen, with the size you set at design time. This is a common setting for dialog boxes and other secondary forms. Another property that affects the initial size and position of a window is its state. You can use the WindowState property at design time to display a maximized or minimized window at startup. This property has only three possible values: wsNormal, wsMinimized, and wsMaximized. If you set a minimized window state, at startup the form will be displayed in the Windows Taskbar. For the main form of an application, this property can be automatically set by specifying the corresponding attributes in a shortcut referring to the application. Of course, you can maximize or minimize a window at run time, too: Changing the value of the WindowState property to wsMaximized or wsNormal produces the expected effect. Setting the property to wsMinimized, however, creates a minimized window that is placed over the Taskbar, not within it. This is not the expected action for a main form, but for a secondary form! The simple solution to this problem is to call the Minimize method of the Application object. There is also a Restore method in the TApplication class that you can use when you need to restore a form, although most often the user will do this operation using the system menu's Restore command. Snapping to the Screen (in Delphi 7)Forms in Delphi 7 have two new properties:
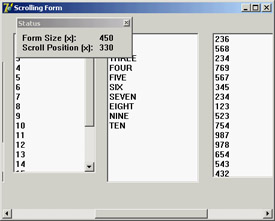
The Size of a Form and Its Client AreaAt design time, there are two ways to set the size of a form: by setting the value of the Width and Height properties or by dragging its borders. At run time, if the form has a resizable border, the user can resize it (producing the OnResize event, where you can perform custom actions to adapt the user interface to the new size of the form). However, if you look at a form's properties in source code or in the online help, you can see that two properties refer to its width and two refer to its height. Height and Width refer to the size of the form, including the borders; ClientHeight and ClientWidth refer to the size of the internal area of the form, excluding the borders, caption, scroll bars (if any), and menu bar. The client area of the form is the surface you can use to place components on the form, to create output, and to receive user input. Notice that in CLX, even Height and Width refer to the size of the internal area of the form. Because you may be interested in having a certain available area for your components, it often makes more sense to set the client size of a form instead of its global size. Doing so is straightforward, because as you set one of the two client properties, the corresponding form property changes accordingly. Form ConstraintsWhen you choose a resizable border for a form, users can generally resize the form as they like and also maximize it to full screen. Windows informs you that the form's size has changed with the wm_Size message, which generates the OnResize event. OnResize takes place after the size of the form has already been changed. Modifying the size again in this event (if the user has reduced or enlarged the form too much) would be silly. A preventive approach is better suited to this problem. Delphi provides a specific property for forms and also for all controls: the Constraints property. Setting the subproperties of the Constraints property to the proper maximum and minimum values creates a form that cannot be resized beyond those limits. Here is an example: object Form1: TForm1 Constraints.MaxHeight = 300 Constraints.MaxWidth = 300 Constraints.MinHeight = 150 Constraints.MinWidth = 150 end Notice that as you set up the Constraints property, it has an immediate effect even at design time, changing the size of the form if it is outside the permitted area. Delphi also uses the maximum constraints for maximized windows, producing an awkward effect. For this reason, you should generally disable the Maximize button of a window that has a maximum size. In some cases maximized windows with a limited size make sense—this is the behavior of Delphi's main window. If you need to change constraints at run time, you can also consider using two specific events, OnCanResize and OnConstrainedResize. The first of the two can also be used to disable resizing a form or control in given circumstances. Scrolling a FormWhen you build a simple application, a single form might hold all the components you need. As the application grows, however, you may need to squeeze in the components, increase the size of the form, or add new forms. If you reduce the space occupied by the components, you might add the capability to resize them at run time, possibly splitting the form into different areas. If you choose to increase the size of the form, you might use scroll bars to let the user move around in a form that is bigger than the screen (or at least bigger than its visible portion on the screen). Adding a scroll bar to a form is simple. In fact, you don't need to do anything—if you place several components in a big form and then reduce its size, a scroll bar will be added to the form automatically, as long as you haven't changed the value of the AutoScroll property from its default of True. Along with AutoScroll, forms have two properties, HorzScrollBar and VertScrollBar, which you can use to set several properties of the two TFormScrollBar objects associated with the form. The Visible property indicates whether the scroll bar is present, the Position property determines the initial status of the scroll thumb, and the Increment property determines the effect of clicking one of the arrows at the ends of the scroll bar. The most important property, however, is Range. The Range property of a scroll bar determines the virtual size of the form, not the range of values of the scroll bar. Suppose you need a form that will host several components and will therefore need to be 1000 pixels wide. You can use this value to set the "virtual range" of the form, changing the Range of the horizontal scroll bar. The Position property of the scroll bar will range from 0 to 1000 minus the current size of the client area. For example, if the client area of the form is 300 pixels wide, you can scroll 700 pixels to see the far end of the form (the thousandth pixel). A Scroll Testing ExampleTo demonstrate the specific case I've just discussed, I've built the Scroll1 example, which has a virtual form 1000 pixels wide. I've set the range of the horizontal scroll bar to 1000: object Form1: TForm1 HorzScrollBar.Range = 1000 VertScrollBar.Range = 305 AutoScroll = False OnResize = FormResize ... The example's form is filled with meaningless list boxes, and I could have obtained the same scroll-bar range by placing the right-most list box so that its position (Left) plus its size (Width) equaled 1000. The interesting part of the example is the presence of a toolbox window displaying the status of the form and of its horizontal scroll bar. This second form has four labels: two with fixed text and two with the output. In addition, the secondary form (called Status) has a bsToolWindow border style and is a top-most window. You should also set its Visible property to True, so its window is automatically displayed at startup: object Status: TStatus BorderIcons = [biSystemMenu] BorderStyle = bsToolWindow FormStyle = fsStayOnTop Visible = True object Label1: TLabel... ... There isn't much code in this program. Its aim is to update the values in the toolbox each time the form is resized or scrolled (as you can see in Figure 7.8). The first part is extremely simple. You can handle the OnResize event of the form and copy a couple of values to the two labels. The labels are part of another form, so you need to prefix them with the name of the form instance, Status: procedure TForm1.FormResize(Sender: TObject); begin Status.Label3.Caption := IntToStr(ClientWidth); Status.Label4.Caption := IntToStr(HorzScrollBar.Position); end; If you wanted to change the output each time the user scrolls the contents of the form, you could not use a Delphi event handler, because forms don't have an OnScroll event (although stand-alone ScrollBar components have one). Omitting this event makes sense, because Delphi forms handle scroll bars automatically in a powerful way. In Windows, by contrast, scroll bars are extremely low-level elements, requiring a lot of coding. Handling the scroll event makes sense only in special cases, such as when you want to keep track precisely of the scrolling operations made by a user. Here is the code you need to write. First, add a method declaration to the class and associate it with the Windows horizontal scroll message (wm_HScroll); then write the code for this procedure, which is almost the same as the code of the FormResize method you've seen before: public procedure WMHScroll (var ScrollData: TWMScroll); message wm_HScroll; procedure TForm1.WMHScroll (var ScrollData: TWMScroll); begin inherited; Status.Label3.Caption := IntToStr(ClientWidth); Status.Label4.Caption := IntToStr(HorzScrollBar.Position); end; It's important to add the call to inherited, which activates the method related to the same message in the base class form. The inherited keyword in Windows message handlers calls the method of the base class you are overriding, which is associated with the corresponding Windows message (even if the procedure name is different). Without this call, the form won't have its default scrolling behavior; that is, it won't scroll at all.
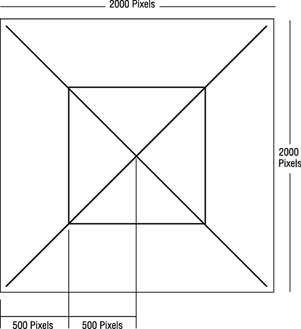
Automatic ScrollingThe scroll bar's Range property can seem strange until you begin to use it consistently. When you think about it, you'll start to understand the advantages of the "virtual range" approach. The scroll bar is automatically removed from the form when the client area of the form is big enough to accommodate the virtual size; and when you reduce the size of the form, the scroll bar is added again. This feature becomes particularly interesting when the AutoScroll property of the form is set to True. In this case, the extreme positions of the rightmost and lower controls are automatically copied into the Range properties of the form's two scroll bars. Automatic scrolling works well in Delphi. In the previous example, the virtual size of the form would be set to the right border of the last list box. This was defined with the following attributes: object ListBox6: TListBox Left = 832 Width = 145 end Therefore, the horizontal virtual size of the form would be 977 (the sum of the two preceding values). This number is automatically copied into the Range field of the HorzScrollBar property of the form, unless you change it manually to have a bigger form (as I've done for the Scroll1 example, setting it to 1000 to leave some space between the last list box and the border of the form). You can see this value in the Object Inspector, or make the following test: Run the program, size the form as you like, and move the scroll thumb to the rightmost position. When you add the size of the form and the position of the thumb, you'll always get 1000, the virtual coordinate of the right-most pixel of the form, whatever the size. Scrolling and Form CoordinatesYou have just seen that forms can automatically scroll their components. But what happens if you paint directly on the surface of the form? Some problems arise, but their solution is at hand. Suppose you want to draw lines on the virtual surface of a form, as shown in Figure 7.9. Because you probably do not own a monitor capable of displaying 2000 pixels on each axis, you can create a smaller form, add two scroll bars, and set their Range property, as I've done in the Scroll2 example. If you draw the lines using the virtual coordinates of the form, the image won't display properly. In the OnPaint response method, you need to compute the virtual coordinates yourself. Fortunately, doing so is easy, because you know that the virtual X1 and Y1 coordinates of the upper-left corner of the client area correspond to the current positions of the two scroll bars: procedure TForm1.FormPaint(Sender: TObject); var X1, Y1: Integer; begin X1 := HorzScrollBar.Position; Y1 := VertScrollBar.Position; // draw a yellow line Canvas.Pen.Width := 30; Canvas.Pen.Color := clYellow; Canvas.MoveTo (30-X1, 30-Y1); Canvas.LineTo (1970-X1, 1970-Y1); // and so on ... As a better alternative, instead of computing the proper coordinate for each output operation, you can call the SetWindowOrgEx API to move the origin of the coordinates of the Canvas. This way, your drawing code will directly refer to virtual coordinates but will be displayed properly:
procedure TForm2.FormPaint(Sender: TObject);
begin
  SetWindowOrgEx (Canvas.Handle, HorzScrollbar.Position,
    VertScrollbar.Position, nil);

  // draw a yellow line
  Canvas.Pen.Width := 30;
  Canvas.Pen.Color := clYellow;
  Canvas.MoveTo (30, 30);
  Canvas.LineTo (1970, 1970);

  // and so on ...
This is the version of the program you'll find in the source code of the book. Try using the program and commenting out the SetWindowOrgEx call to see what happens if you don't use virtual coordinates: You'll find that the output of the program is not correct—it won't scroll, and the same image will always remain in the same position, regardless of scrolling operations. Notice also that the Qt/CLX version of the program, called QScroll2, doesn't use virtual coordinates but simply subtracts the scroll positions from each of the hard-coded coordinates. Scaling FormsWhen you create a form with multiple components, you can select a fixed-size border or let the user resize the form and automatically add scroll bars to reach the components falling outside the visible portion of the form, as you've just seen. This might also happen because a user of your application has a display driver with a much smaller number of pixels than yours. Instead of reducing the form size and scrolling the content, you might want to reduce the size of each of the components at the same time. This automatically happens if the user has a system font with a different pixel-per-inch ratio than the one you used for development. To address these problems, Delphi has some nice scaling features, but they aren't fully intuitive. The form's ScaleBy method allows you to scale the form and each of its components. The PixelsPerInch and Scaled properties let Delphi resize an application automatically when the application is run with a different system font size, often because of a different screen resolution. In both cases, to make the form scale its window, be sure to also set the AutoScroll property to False. Otherwise, the contents of the form will be scaled, but the form border itself will not. These two approaches are discussed in the next two sections.
Manual Form ScalingAny time you want to scale a form, including its components, you can use the ScaleBy method, which has two integer parameters, a multiplier and a divisor—it's a fraction. For example, this statement reduces the size of the current form to three-quarters of its original size: ScaleBy (3, 4); The same effect can be obtained by using ScaleBy (75, 100); When you scale a form, all the proportions are maintained, but if you go below or above certain limits, the text strings can alter their proportions slightly. The problem is that in Windows, components can be placed and sized only in whole pixels, whereas scaling almost always involves multiplying by fractional numbers. So, any fractional portion of a component's origin or size will be truncated. I've built a simple example, Scale (or QScale), to show how you can scale a form manually, responding to a request by the user. The application form has two buttons, a label, an edit box, and an UpDown control connected to it (via its Associate property). With this setting, a user can type numbers in the edit box or click the two small arrows to increase or decrease the value (by the amount indicated by the Increment property). To extract the input value, you can use the Text property of the edit box or the Position of the UpDown control. When you click the Do Scale button, the current input value is used to determine the scaling percentage of the form: procedure TForm1.ScaleButtonClick(Sender: TObject); begin AmountScaled := UpDown1.Position; ScaleBy (AmountScaled, 100); UpDown1.Height := Edit1.Height; ScaleButton.Enabled := False; RestoreButton.Enabled := True; end; This method stores the current input value in the form's AmountScaled private field and enables the Restore button, disabling the button that was clicked. Later, when the user clicks the Restore button, the opposite scaling takes place. By having to restore the form before another scaling operation takes place, I avoid an accumulation of round-off errors. I've also added a line to set the Height of the UpDown component to the same Height as the edit box it is attached to. This prevents small differences between the two, due to scaling problems of the UpDown control.
The same scaling technique also works in CLX, as you can see by running the QScale example. The only real difference is that I replaced the UpDown component (and the related edit box) with a SpinEdit control, because the former is not available in Qt. Automatic Form ScalingInstead of playing with the ScaleBy method, you can have Delphi do the work for you. When Delphi starts, it asks the system for the display configuration and stores the value in the PixelsPerInch property of the Screen object, a special global object of VCL that's available in any application. PixelsPerInch sounds like it has something to do with the pixel resolution of the screen (actually available in Screen.Height and Screen.Width), but unfortunately, it doesn't. If you change your screen resolution from 640×480 to 800×600 to 1024×768 or even 1600×1280, you will find that Windows reports the same PixelsPerInch value in all cases, unless you change the system font. PixelsPerInch really refers to the screen pixel resolution for which the currently installed system font was designed. When a user changes the system font scale, usually to make menus and other text easier to read, the user will expect all applications to honor those settings. An application that does not reflect user desktop preferences will look out of place and, in extreme cases, may be unusable to visually impaired users who rely on very large fonts and high-contrast color schemes. The most common PixelsPerInch values are 96 (small fonts) and 120 (large fonts), but other values are possible. Newer versions of Windows let the user set the system font size to an arbitrary scale. At design time, the PixelsPerInch value of the screen, which is a read-only property, is copied to every form of the application. Delphi then uses the value of PixelsPerInch, if the Scaled property is set to True, to resize the form when the application starts. As I've mentioned, both automatic scaling and the scaling performed by the ScaleBy method operate on components by changing the size of the font. The size of each control depends on the font it uses. With automatic scaling, the value of the form's PixelsPerInch property (the design-time value) is compared to the current system value (indicated by the corresponding property of the Screen object), and the result is used to change the font of the components on the form. To improve the accuracy of this code, the final height of the text is compared to the design-time height of the text, and its size is adjusted if the heights do not match. Thanks to Delphi automatic support, the same application running on a system with a different system font size automatically scales itself, without any specific code. The application's edit controls will be the correct size to display their text in the user's preferred font size, and the form will be the correct size to contain those controls. Although automatic scaling has problems in some special cases, if you comply with the following rules, you should get good results:
|
|
||||||||||||||||||||||||||||||||||||||||||||||||||||||||||||||||||||||||||||||||||||||||||||||||||||||||||||||||||||||||||||||||||||||||||||||||||||||||||||||||||||||||||||||||||||||||||||||
|