|
|
|
Customizing a Database GridUnlike most other data-aware controls, which have few properties to tune, the DBGrid control has many options and is more powerful than you might think. The following sections explore some of the advanced operations you can do using a DBGrid control. The first example shows how to draw in a grid, and the second shows how to use the grid's multiple-selection feature. Painting a DBGridThere are many reasons you might want to customize the output of a grid. A good example is to highlight specific fields or records. Another is to provide output for fields that usually don't show up in the grid, such as BLOB, graphic, and memo fields. To thoroughly customize the drawing of a DBGrid control, you must set its DefaultDrawing property to False and handle its OnDrawColumnCell event. If you leave the value of DefaultDrawing set to True, the grid will display the default output before the method is called. In that case, all you can do is add something to the default output of the grid (unless you decide to draw over it, which will take extra time and cause flickering). The alternative approach is to call the grid's DefaultDrawColumnCell method, perhaps after changing the current font or restricting the output rectangle. In this last case, you can provide an extra drawing in a cell and let the grid fill the remaining area with the standard output. This is what I did in the DrawData program. The DBGrid control in this example, which is connected to the Borland's classic Biolife table, has the following properties: object DBGrid1: TDBGrid Align = alClient DataSource = DataSource1 DefaultDrawing = False OnDrawColumnCell = DBGrid1DrawColumnCell end The OnDrawColumnCell event handler is called once for each grid cell and has several parameters, including the rectangle corresponding to the cell, the index of the column you have to draw, the column itself (with the field, its alignment, and other subproperties), and the status of the cell. To set the color of specific cells to red, you change it in the special cases:
procedure TForm1.DBGrid1DrawColumnCell(Sender: TObject;
  const Rect: TRect; DataCol: Integer; Column: TColumn;
  State: TGridDrawState);
begin
  // red font color if length > 100
  if (Column.Field = cdsLengthcm) and (cdsLengthcm.AsInteger > 100) then
    DBGrid1.Canvas.Font.Color := clRed;

  // default drawing
  DBGrid1.DefaultDrawDataCell (Rect, Column.Field, State);
end;
The next step is to draw the memo and the graphics fields. For the memo, you can implement the memo field's OnGetText and OnSetText events. The grid will even allow editing on a memo field if its OnSetText event is not nil. Here is the code for the two event handlers. I used Trim to remove trailing nonprinting characters that make the text appear to be empty when editing: procedure TForm1.cdsNotesGetText(Sender: TField; var Text: String; DisplayText: Boolean); begin Text := Trim (Sender.AsString); end; procedure TForm1.cdsNotesSetText(Sender: TField; const Text: String); begin Sender.AsString := Text; end; For the image, the simplest approach is to create a temporary TBitmap object, assign the graphics field to it, and paint the bitmap to the grid's Canvas. As an alternative, I removed the graphics field from the grid by setting its Visible property to False and added the image to the fish name, with the following extra code in the OnDrawColumnCell event handler:
var
  Picture: TPicture;
  OutRect: TRect;
  PictWidth: Integer;
begin
  // default output rectangle
  OutRect := Rect;

  if Column.Field = cdsCommon_Name then
  begin
    // draw the image
    Picture := TPicture.Create;
    try
      Picture.Assign(cdsGraphic);
      PictWidth := (Rect.Bottom - Rect.Top) * 2;
      OutRect.Right := Rect.Left + PictWidth;
      DBGrid1.Canvas.StretchDraw (OutRect, Picture.Graphic);
    finally
      Picture.Free;
    end;
    // reset output rectangle, leaving space for the graphic
    OutRect := Rect;
    OutRect.Left := OutRect.Left + PictWidth;
  end;

  // red font color if length > 100 (omitted — see above)

  // default drawing
  DBGrid1.DefaultDrawDataCell (OutRect, Column.Field, State);
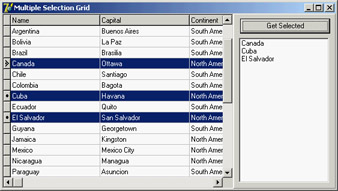
As you can see in this code, the program shows the image in a small rectangle on the left of the grid cell and then changes the output rectangle to the remaining area before activating the default drawing. You can see the effect in Figure 13.12. A Grid Allowing Multiple SelectionThe second example of customizing the DBGrid control relates to multiple selection. You can set up the DBGrid so that a user can select multiple rows (that is, multiple records). Doing so is easy, because all you have to do is toggle the dgMultiSelect element of the grid's Options property. Once you select this option, a user can keep the Ctrl key pressed and click with the mouse to select multiple grid rows, with the effect shown in Figure 13.13. Because the database table can have only one active record, the grid keeps a list of bookmarks to the selected records. This list is available in the SelectedRows property, which is of type TBookmarkList. Besides accessing the number of objects in the list with the Count property, you can get to each bookmark with the Items property, which is the default array property. Each list item is of a TBookmarkStr type, which represents a bookmark pointer you can assign to the table's Bookmark property.
To summarize the steps, here is the code for the MltGrid example, which is activated by clicking the button to move the Name field of the selected records to the list box:
procedure TForm1.Button1Click(Sender: TObject);
var
  I: Integer;
  BookmarkList: TBookmarkList;
  Bookmark: TBookmarkStr;
begin
  // store the current position
  Bookmark := cds.Bookmark;
  try
    // empty the list box
    ListBox1.Items.Clear;
    // get the selected rows of the grid
    BookmarkList := DbGrid1.SelectedRows;
    for I := 0 to BookmarkList.Count - 1 do
    begin
      // for each, move the table to that record
      cds.Bookmark := BookmarkList[I];
      // add the name field to the listbox
      ListBox1.Items.Add (cds.FieldByName ('Name').AsString);
    end;
  finally
    // go back to the initial record
    cds.Bookmark := Bookmark;
  end;
end;
Dragging to a GridAnother interesting technique is to use dragging with grids. Dragging from a grid is not difficult, because you know which current record and column the user has selected. Dragging to a grid, however, is tricky to program. Recall that in Chapter 3 I mentioned the "protected hack"; I'll use this technique to implement dragging to a grid. The example, called DragToGrid, has a grid connected to the country dataset, an edit box in which you can type the new value for a field, and a label you can drag over a grid cell to modify the related field. The problem is how to determine this field. The code is only a few lines, as you can see here, but it is cryptic and requires some explanation:
type
  TDBGHack = class (TDbGrid)
  end;

procedure TFormDrag.DBGrid1DragDrop(Sender, Source: TObject; X, Y: Integer);
var
  gc: TGridCoord;
begin
  gc := TDBGHack (DbGrid1).MouseCoord (x, y);
  if (gc.y > 0) and (gc.x > 0) then
  begin
    DbGrid1.DataSource.DataSet.MoveBy (gc.y - TDBGHack(DbGrid1).Row);
    DbGrid1.DataSource.DataSet.Edit;
    DBGrid1.Columns.Items [gc.X - 1].Field.AsString := EditDrag.Text;
  end;
  DBGrid1.SetFocus;
end;
The first operation determines the cell over which the mouse was released. Starting with the x and y mouse coordinates, you can call the protected MouseCoord method to access the row and column of the cell. Unless the drag target is the first row (usually hosting the titles) or the first column (usually hosting the indicator), the program moves the current record by the difference between the requested row (gc.y) and the current active row (the grid's protected Row property). The next step puts the dataset into edit mode, grabs the field of the target column (Columns.Items [gc.X - 1].Field), and changes its text. |
|
||||||||||||||||||||||||||||||||||||||||||||||||||||||||||||||||||||||||||||||||||||||||||||||||||||||||||||||||||||||||||||||||||||||||||||||||||||||||||||||||||||||||||||||||||||||||
|