|
|
|
The Packets and the CacheThe ClientDataSet component reads data in packets containing the number of records indicated by the PacketRecords property. The default value of this property is –1, which means the provider will pull all the records at once (this is reasonable only for a small dataset). Alternatively, you can set this value to zero to ask the server for only the field descriptors and no data, or you can use any positive value to specify a number. If you retrieve only a partial dataset, then as you browse past the end of the local cache, if the FetchOnDemand property is set to True (the default value), the ClientDataSet component will get more records from its source. This property also controls whether BLOB fields and nested datasets of the current records are fetched automatically (these values might not be part of the data packet, depending on the dataset provider's Options value). If you turn off this property, you'll need to fetch more records manually by calling the GetNextPacket method until the method returns zero. (You call FetchBlobs and FetchDetails for these other elements.)
Manipulating UpdatesOne of the core ideas behind the ClientDataSet component is that it is used as a local cache to collect input from a user and then send a batch of update requests to the database. The component has both a list of the changes to apply to the database server, stored in the same format used by the ClientDataSet (accessible though the Delta property), and a complete update log that you can manipulate with a few methods (including an Undo capability).
The Status of the RecordsThe component lets you monitor what's going on within the data packets. The UpdateStatus method returns one of the following indicators for the current record: type TUpdateStatus = (usUnmodified, usModified, usInserted, usDeleted); To easily check the status of every record in the client dataset, you can add a string-type calculated field to the dataset (I've called it ClientDataSet1Status) and compute its value with the following OnCalcFields event handler:
procedure TForm1.ClientDataSet1CalcFields(DataSet: TDataSet);
begin
  ClientDataSet1Status.AsString := GetEnumName (TypeInfo(TUpdateStatus),
    Integer (ClientDataSet1.UpdateStatus));
end;
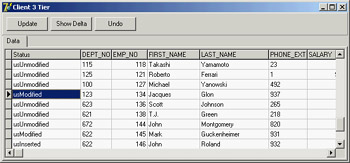
This method (based on the RTTI GetEnumName function) converts the current value of the TUpdateStatus enumeration to a string, with the effect you can see in Figure 14.10. Accessing the DeltaBeyond examining the status of each record, the best way to understand which changes have occurred in a given ClientDataSet (but haven't been uploaded to the server) is to look at the delta—the list of changes waiting to be applied to the server. This property is defined as follows: property Delta: OleVariant; The format used by the Delta property is the same as that used for the data of a client dataset. You can add another ClientDataSet component to an application and connect it to the data in the Delta property of the first client dataset: if ClientDataSet1.ChangeCount > 0 then begin ClientDataSet2.Data := ClientDataSet1.Delta; ClientDataSet2.Open; In the CdsDelta example, I've added a data module with the two ClientDataSet components and a source of data: a SQLDataSet mapped to InterBase's EMPLOYEE demo table. Both client datasets have the extra status calculated field, with a slightly more generic version than the code discussed earlier, because the event handler is shared between them.
The application's form has a page control with two pages, each of which has a DBGrid, one for the data and one for the delta. Code hides or shows the second tab depending on the existence of data in the change log, as returned by the ChangeCount method, and updates the delta when the corresponding tab is selected. The core of the code used to handle the delta is similar to the previous code snippet, and you can study the example source code on the CD to see more details. Figure 14.11 shows the change log of the CdsDelta application. Notice that the delta dataset has two entries for each modified record (the original values and the modified fields) unless this is a new or deleted record, as indicated by its status. 
Figure 14.11: The CdsDelta example allows you to see the temporary update requests stored in the Delta property of the ClientDataSet.
Updating the DataNow that you have a better understanding of what goes on during local updates, you can try to make this program work by sending the local update (stored in the delta) back to the database server. To apply all the updates from a dataset at once, pass –1 to the ApplyUpdates method. If the provider (or the Resolver component inside it) has trouble applying an update, it triggers the OnReconcileError event. This can take place because of a concurrent update by two different people. We tend to use optimistic locking in client/server applications, so this should be regarded as a normal situation. The OnReconcileError event allows you to modify the Action parameter (passed by reference), which determines how the server should behave: procedure TForm1.ClientDataSet1ReconcileError(DataSet: TClientDataSet; E: EReconcileError; UpdateKind: TUpdateKind; var Action: TReconcileAction); This method has three parameters: the client dataset component (in case there is more than one client dataset in the current application), the exception that caused the error (with the error message), and the kind of operation that failed (ukModify, ukInsert, or ukDelete). The return value, which you'll store in the Action parameter, can be any one of the following: type TReconcileAction = (raSkip, raAbort, raMerge, raCorrect, raCancel, raRefresh);
To test a collision, you can launch two copies of the client application, change the same record in both clients, and then post the updates from both. We'll do this later to generate an error, but let's first see how to handle the OnReconcileError event. Handling this event is not too difficult, but only because you'll receive a little help. Because building a specific form to handle an OnReconcileError event is common, Delphi provides such a form in the Object Repository (available with the File ® New ® Other menu command of the Delphi IDE). Go to the Dialogs page and select the Reconcile Error Dialog item. This unit exports a function you can use directly to initialize and display the dialog box, as I've done in the CdsDelta example: procedure TDmCds.cdsEmployeeReconcileError (DataSet: TCustomClientDataSet; E: EReconcileError; UpdateKind: TUpdateKind; var Action: TReconcileAction); begin Action := HandleReconcileError(DataSet, UpdateKind, E); end;
The HandleReconcileError function creates the dialog box form and shows it, as you can see in the code provided by Borland:
function HandleReconcileError(DataSet: TDataSet; UpdateKind: TUpdateKind;
  ReconcileError: EReconcileError): TReconcileAction;
var
  UpdateForm: TReconcileErrorForm;
begin
  UpdateForm := TReconcileErrorForm.CreateForm(DataSet, UpdateKind,
    ReconcileError);
  with UpdateForm do
  try
    if ShowModal = mrOK then
    begin
      Result := TReconcileAction(ActionGroup.Items.Objects[
        ActionGroup.ItemIndex]);
      if Result = raCorrect then
        SetFieldValues(DataSet);
    end
    else
      Result := raAbort;
  finally
    Free;
  end;
end;
The Reconc unit, which hosts the Reconcile Error dialog (a window titled Update Error to be more understandable by end-users of your programs), contains more than 350 lines of code, so I can't describe it in detail. However, you should be able to understand the source code by studying it carefully. Alternatively, you can use it without caring how everything works. The dialog box will appear in case of an error, reporting the requested change that caused the conflict and allowing the user to choose one of the possible TReconcileAction values. You can see this form at run time in Figure 14.12. 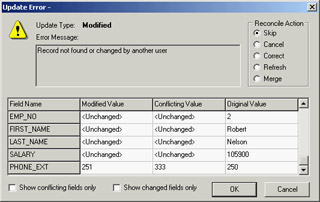
Figure 14.12: The Reconcile Error dialog provided by Delphi in the Object Repository and used by the CdsDelta example
Using TransactionsWhenever you are working with a SQL server, you should use transactions to make your applications more robust. You can think of a transaction as a series of operations that are considered a single, "atomic" whole that cannot be split. An example may help to clarify the concept. Suppose you have to raise the salary of each employee of a company by a fixed rate, as you did in the Total example in Chapter 13. A typical program would execute a series of SQL statements on the server, one for each record to update. If an error occurred during the operation, you might want to undo the previous changes. If you consider the operation "raise the salary of each employee" as a single transaction, it should either be completely performed or completely ignored. Or, consider the analogy with financial transactions—if an error causes only part of the operation to be performed, you might end up with a missed credit or with some extra money. Working with database operations as transactions serves a useful purpose. You can start a transaction and do several operations that should all be considered parts of a single larger operation; then, at the end, you can either commit the changes or roll back the transaction, discarding all the operations done up to that moment. Typically, you might want to roll back a transaction if an error occurred during its operations. There is another important element to underline: Transactions also serve a purpose when reading data. Until data is committed by a transaction, other connections and/or transactions should not see it. Once the data is committed from a transaction, others should see the change when reading the data—that is, unless you need to open a transaction and read the same data over and over for data analysis or complex reporting operations. Different SQL servers allow you to read data in transaction according to some or all of these alternatives, as you'll see when we discuss transaction isolation levels. Handling transactions in Delphi is simple. By default, each edit/post operation is considered a single implicit transaction, but you can alter this behavior by handling the operations explicitly. Use the following three methods of the dbExpress SQLConnection component (other database connection components have similar methods):
You can also use the InTransaction property to check whether a transaction is active. You'll often use a try block to roll back a transaction when an exception is raised, or you can commit the transaction as the last operation of the try block, which is executed only when there is no error. The code might look like this:
var
  TD: TTransactionDesc;
begin
  TD.TransactionID := 1;
  TD.IsolationLevel := xilREADCOMMITTED;
  SQLConnection1.StartTransaction(TD);
  try
    // -- operations within the transaction go here --
    SQLConnection1.Commit(TD);
  except
     SQLConnection1.Rollback(TD);
  end;
Each transaction-related method has a parameter describing the transaction it is working with. The parameter uses the record type TTransactionDesc and accounts for a transaction isolation level and a transaction ID. The transaction isolation level is an indication of how the transaction should behave when other transactions make changes to the data. The three predefined values are as follows:
The other field of the TTransactionDesc record holds a transaction ID. It is useful only in conjunction with a database server supporting multiple concurrent transactions over the same connection, like InterBase does. You can ask the connection component whether the server supports multiple transactions or doesn't support transactions at all, using the MultipleTransactionsSupported and TransactionsSupported properties. When the server supports multiple transactions, you must supply each transaction with a unique identifier when calling the StartTransaction method: var TD: TTransactionDesc; begin TD.TransactionID := GetTickCount; TD.IsolationLevel := xilREADCOMMITTED; SQLConnection1.StartTransaction(TD); SQLDataSet1.TransactionLevel := TD.TransactionID; You can also indicate which datasets belong to which transaction by setting the TransactionLevel property of each dataset to a transaction ID, as shown in the last statement. To further inspect transactions and to experiment with transaction isolation levels, you can use the TranSample application. As you can see in Figure 14.13, radio buttons let you choose the various isolation levels and buttons let you work on the transactions and apply updates or refresh data. To get a real idea of the different effects, you should run multiple copies of the program (provided you have enough licenses on your InterBase server). 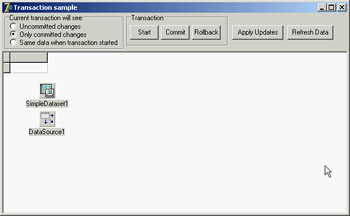
Figure 14.13: The form of the TranSample application at design time. The radio buttons let you set different transaction isolation levels.
|
|
|||||||||||||||||||||||||||||||||||||||||||||||||||||||||||||||||||||||||||||||||||||||||||||||||||||||||||||||||||||||||||||||||||||||||||||||||||||||||||||||||||||||||||||||||||||||||||||||||||||||||||||
|