|
|
|
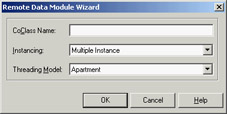
Building a Sample ApplicationNow you're ready to build a sample program. Doing so will let you observe some of the components I've just described in action, and will also allow you to focus on some other problems, shedding light on other pieces of the Delphi multitier puzzle. I'll build the client and application server portions of a three-tier application in two steps. The first step will simply test the technology using a minimum of elements. These programs will be very simple. From that point, I'll add more power to the client and the application server. In each example, I'll display data from a local InterBase table using dbExpress and set up everything to allow you to test the programs on a stand-alone computer. I won't cover the steps you have to follow to install the examples on multiple computers with various technologies—that would be the subject of at least one other book. The First Application ServerThe server side of the basic example is easy to build. Simply create a new application and add a remote data module to it using the corresponding icon in the Multitier page of the Object Repository. The Remote Data Module Wizard (see Figure 16.1) will ask you for a class name and the instancing style. When you enter a class name, such as AppServerOne, and click the OK button, Delphi will add a data module to the program. This data module will have the usual properties and events, but its class will have the following Delphi language declaration:
type
  TAppServerOne = class(TRemoteDataModule, IAppServerOne)
  private
    { Private declarations }
  protected
    class procedure UpdateRegistry(Register: Boolean;
      const ClassID, ProgID: string); override;
  public
    { Public declarations }
  end;
In addition to inheriting from the TRemoteDataModule base class, this class implements the custom IAppServerOne interface, which derives from the standard DataSnap interface (IAppServer). The class also overrides the UpdateRegistry method to add support for enabling the socket and web transports, as you can see in the code generated by the wizard. At the end of the unit, you'll find the class factory declaration, which should be clear if you read Chapter 12:
initialization
  TComponentFactory.Create(ComServer, TAppServerOne,
    Class_AppServerOne, ciMultiInstance, tmApartment);
end.
Now you can add a dataset component to the data module (I've used the dbExpress SQLDataSet), connect it to a database and a table or query, activate it, and finally add a DataSetProvider and hook it to the dataset component. You'll obtain a DFM file like this:
object AppServerOne: TAppServerOne
  object SQLConnection1: TSQLConnection
    ConnectionName = 'IBLocal'
    LoginPrompt = False
  end
  object SQLDataSet1: TSQLDataSet
    SQLConnection = SQLConnection1
    CommandText = 'select * from EMPLOYEE'
  end
  object DataSetProvider1: TDataSetProvider
    DataSet = SQLDataSet1
    Constraints = True
  end
end
The main form of this program is almost useless, so you can simply add a label to it indicating that it's the form of the server application. When you've built the server, you should compile it and run it once. This operation will automatically register it as an Automation server on your system, making it available to client applications. Of course, you should register the server on the computer where you want it to run, either the client or the middle tier. The First Thin ClientNow that you have a working server, you can build a client that will connect to it. You'll again begin with a standard Delphi application and add a DCOMConnection component to it (or the proper component for the specific type of connection you want to test). This component defines a ComputerName property that you'll use to specify the computer that hosts the application server. If you want to test the client and application server from the same computer, you can leave this property blank. Once you've selected an application server computer, you can simply display the ServerName property's combo box list to view the available DataSnap servers. This combo box shows the servers' registered names, by default the name of the executable file of the server followed by the name of the remote data module class, as in AppServ1.AppServerOne. Alternatively, you can enter the GUID of the server object as the ServerGUID property. Delphi will automatically fill this property as you set the ServerName property, determining the GUID by looking it up in the Registry. At this point, if you set the DCOMConnection component's Connected property to True, the server form will appear, indicating that the client has activated the server. You don't usually need to perform this operation, because the ClientDataSet component typically activates the RemoteServer component for you. I've suggested this step simply to emphasize what's happening behind the scenes.
As you might expect, the next step is to add a ClientDataSet component to the form. You must connect the ClientDataSet to the DCOMConnection1 component via the RemoteServer property, and thereby to one of the providers it exports. You can see the list of available providers in the ProviderName property, via the usual combo box. In this example, you'll be able to select only DataSetProvider1, because it is the only provider available in the server you've just built. This operation connects the dataset in the client's memory with the dbExpress dataset on the server. If you activate the client dataset and add a few data-aware controls (or a DBGrid), you'll immediately see the server data appear in them, as illustrated in Figure 16.2. 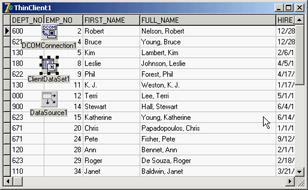
Figure 16.2: When you activate a ClientDataSet component con-nected to a remote data module at design time, the data from the server becomes visible as usual. Here is the DFM file for the minimal client application, ThinCli1:
object Form1: TForm1
  Caption = 'ThinClient1'
  object DBGrid1: TDBGrid
    Align = alClient
    DataSource = DataSource1
  end
  object DCOMConnection1: TDCOMConnection
    ServerGUID = '{09E11D63-4A55-11D3-B9F1-00000100A27B}'
    ServerName = 'AppServ1.AppServerOne'
  end
  object ClientDataSet1: TClientDataSet
    Aggregates = <>
    Params = <>
    ProviderName = 'DataSetProvider1'
    RemoteServer = DCOMConnection1
  end
  object DataSource1: TDataSource
    DataSet = ClientDataSet1
  end
end
Obviously, the programs for this first three-tier application are quite simple, but they demonstrate how to create a dataset viewer that splits the work between two different executable files. At this point, the client is only a viewer. If you edit the data on the client, it won't be updated on the server. To accomplish this, you'll need to add more code to the client. However, before you do that, let's add some features to the server. |
|
||||||||||||||||||||||||||||||||||||||||||||||||||||||||||||||||||||||||||||||||||||||||||||||||||||||||||||||||||||||||||||||||||||||||||||||||||||||||||||||||||||||||||||||||||||||||
|