|
|
|
Programming with the DOMBecause an XML document has a tree-like structure, loading an XML document into a tree in memory is a natural fit. This is what the DOM does. The DOM is a standard interface, so when you have written code that uses a DOM, you can switch DOM implementations without changing your source code (at least, if you haven't used any non-custom extensions). In Delphi, you can install several DOM implementations, available as COM servers, and use their interfaces. One of the most commonly used DOM engines on Windows is the one provided by Microsoft as part of the MSXML SDK but also installed by Internet Explorer (and for this reason in all recent versions of Windows) and many other Microsoft applications. (With the full MSXML SDK also containing documentation and examples you don't get in other embedded installations of the same library.) Other DOM engines directly available in Delphi 7 include Apache Foundation's Xerces and the open-source OpenXML.
Delphi embeds the DOM implementations into a wrapper component called XMLDocument. I used this component in the preceding example, but here I will examine its role in a more general way. The idea behind using this component instead of the DOM interface is that you remain more independent from the implementations and can work with some simplified methods, or helpers. The DOM interface is complex to use. A document is a collection of nodes, each having a name, a text element, a collection of attributes, and a collection of child nodes. Each collection of nodes lets you access elements by position or search for them by name. Notice that the text within the tags of a node, if any, is rendered as a child of the node and listed in its collection of child nodes. The root node has some extra methods for creating new nodes, values, or attributes. With Delphi's XMLDocument, you can work at two levels:
In the following examples (particularly the DomCreate demo), I'll use both approaches to give you a better idea of the practical differences between the two approaches. An XML Document in a TreeViewThe starting point generally consists of loading a document from a file or creating it from a string, but you can also start with a new document. As a first example of using the DOM, I've built a program that can load an XML document into a DOM and show its structure in a TreeView control. I've also added to the XmlDomTree program a few buttons with sample code used to access to the elements of a sample file, as an example of accessing the DOM data. Loading the document is simple, but showing it in a tree requires a recursive function that navigates the nodes and subnodes. Here is the code for the two methods:
procedure TFormXmlTree.btnLoadClick(Sender: TObject);
begin
  OpenDialog1.InitialDir := ExtractFilePath (Application.ExeName);
  if OpenDialog1.Execute then
  begin
    XMLDocument1.LoadFromFile(OpenDialog1.FileName);
    Treeview1.Items.Clear;
    DomToTree (XMLDocument1.DocumentElement, nil);
    TreeView1.FullExpand;
  end;
end;

procedure TFormXmlTree.DomToTree (XmlNode: IXMLNode; TreeNode: TTreeNode);
var
  I: Integer;
  NewTreeNode: TTreeNode;
  NodeText: string;
  AttrNode: IXMLNode;
begin
  // skip text nodes and other special cases
  if XmlNode.NodeType <> ntElement then
    Exit;
  // add the node itself
  NodeText := XmlNode.NodeName;
  if XmlNode.IsTextElement then
    NodeText := NodeText + ' = ' + XmlNode.NodeValue;
  NewTreeNode := TreeView1.Items.AddChild(TreeNode, NodeText);
  // add attributes
  for I := 0 to xmlNode.AttributeNodes.Count - 1 do
  begin
    AttrNode := xmlNode.AttributeNodes.Nodes[I];
    TreeView1.Items.AddChild(NewTreeNode,
      '[' + AttrNode.NodeName + ' = "' + AttrNode.Text + '"]');
  end;
  // add each child node
  if XmlNode.HasChildNodes then
    for I := 0 to xmlNode.ChildNodes.Count - 1 do
      DomToTree (xmlNode.ChildNodes.Nodes [I], NewTreeNode);
end;
This code is interesting because it highlights some of the operations you can do with a DOM. First, each node has a NodeType property you can use to determine whether the node is an element, attribute, text node, or special entity (such as CDATA and others). Second, you cannot access the textual representation of the node (its NodeValue) unless it has a text element (notice that the text node will be skipped, as per the initial test). After displaying the name of the item, and then the text value if available, the program shows the content of each attribute directly and of each subnode by calling the DomToTree method recursively (see Figure 22.2). 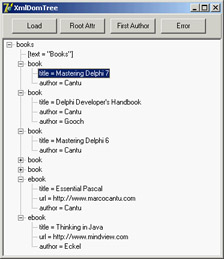
Figure 22.2: The XmlDomTree example can open a generic XML document and show it inside a TreeView common control. Once you have loaded the sample document that accompanies the XmlDomTree program (shown in Listing 22.1) into the XMLDocument component, you can use the various methods to access generic nodes, as in the previous tree-building code, or fetch specific elements. For example, you can grab the value of the attribute text of the root node by writing: XMLDocument1.DocumentElement.Attributes ['text'] Notice that if there is no attribute called text, the call will fail with a generic error message, "Invalid variant type conversion," which helps neither you nor the end user to understand what's wrong. If you need to access to the first attribute of the root without knowing its name, you can use the following code: XMLDocument1.DocumentElement.AttributeNodes.Nodes[0].NodeValue To access the nodes, you use a similar technique, possibly taking advantage of the ChildValues array. This is a Delphi extension to the DOM, which allows you to pass as parameter either the name of the element or its numeric position: XMLDocument1.DocumentElement.ChildNodes.Nodes[1].ChildValues['author'] This code gets the (first) author of the second book. You cannot use the ChildValues['book'] expression, because there are multiple nodes with the same name under the root node.
Listing 22.1: The Sample XML Document Used by Examples in this Chapter
<?xml version="1.0" encoding="UTF-8"?>
<books text="Books">
  <book>
    <title>Mastering Delphi 7</title>
    <author>Cantu</author>
  </book>
  <book>
    <title>Delphi Developer's Handbook</title>
    <author>Cantu</author>
    <author>Gooch</author>
  </book>
  <book>
    <title>Delphi COM Programming</title>
    <author>Harmon</author>
  </book>
  <book>
    <title>Thinking in C++</title>
    <author>Eckel</author>
  </book>
  <ebook>
    <title>Essential Pascal</title>
    <url>http://www.marcocantu.com</url>
    <author>Cantu</author>
  </ebook>
  <ebook>
    <title>Thinking in Java</title>
    <url>http://www.mindview.com</url>
    <author>Eckel</author>
  </ebook>
</books>
Creating Documents Using the DOMAlthough I mentioned earlier that you can create an XML document by chaining together strings, this technique is far from robust. Using a DOM to create a document ensures that the XML will be well formed. Also, if the DOM has a schema definition attached, you can validate the structure of the document while adding data to it. To highlight different cases of document creation, I've built the DomCreate example. This program can create XML documents within the DOM, showing their text on a memo and optionally in a TreeView.
The Simple button on the form creates simple XML text using the low-level, official DOM interfaces. The program calls the document's createElement method for each node, adding them as children of other nodes:
procedure TForm1.btnSimpleClick(Sender: TObject);
var
  iXml: IDOMDocument;
  iRoot, iNode, iNode2, iChild, iAttribute: IDOMNode;
begin
  // empty the document
  XMLDoc.Active := False;
  XMLDoc.XML.Text := '';
  XMLDoc.Active := True;

  // root
  iXml := XmlDoc.DOMDocument;
  iRoot := iXml.appendChild (iXml.createElement ('xml'));
  // node "test"
  iNode := iRoot.appendChild (iXml.createElement ('test'));
  iNode.appendChild (iXml.createElement ('test2'));
  iChild := iNode.appendChild (iXml.createElement ('test3'));
  iChild.appendChild (iXml.createTextNode('simple value'));
  iNode.insertBefore (iXml.createElement ('test4'), iChild);

  // node replication
  iNode2 := iNode.cloneNode (True);
  iRoot.appendChild (iNode2);

  // add an attribute
  iAttribute := iXml.createAttribute ('color');
  iAttribute.nodeValue := 'red';
  iNode2.attributes.setNamedItem (iAttribute);

  // show XML in memo
  Memo1.Lines.Text := FormatXMLData (XMLDoc.XML.Text);
end;
Notice that text nodes are added explicitly, attributes are created with a specific create call, and the code uses cloneNode to replicate an entire branch of the tree. Overall, the code is cumbersome to write, but after a while you may get used to this style. The effect of the program is shown (formatted in the memo and in the tree) in Figure 22.3. The second example of DOM creation relates to a dataset. I've added to the form a dbExpress dataset component (but any other dataset would do). I also added to a button the call to my custom DataSetToDOM procedure, like this: DataSetToDOM ('customers', 'customer', XMLDoc, SQLDataSet1);
The DataSetToDOM procedure creates a root node with the text of the first parameter, grabs each record of the dataset, defines a node with the second parameter, and adds a subnode for each field of the record, all using extremely generic code:
procedure DataSetToDOM (RootName, RecordName: string; XMLDoc: TXMLDocument;
  DataSet: TDataSet);
var
  iNode, iChild: IXMLNode;
  i: Integer;
begin
  DataSet.Open;
  DataSet.First;
  // root
  XMLDoc.DocumentElement := XMLDoc.CreateNode (RootName);

  // add table data
  while not DataSet.EOF do
  begin
    // add a node for each record
    iNode := XMLDoc.DocumentElement.AddChild (RecordName);
    for I := 0 to DataSet.FieldCount - 1 do
    begin
      // add an element for each field
      iChild := iNode.AddChild (DataSet.Fields[i].FieldName);
      iChild.Text := DataSet.Fields[i].AsString;
    end;
    DataSet.Next;
  end;
  DataSet.Close;
end;
The preceding code uses the simplified DOM access interfaces provided by Borland, which include an AddChild node that creates the subnode, and the direct access to the Text property for defining a child node with textual content. This routine extracts an XML representation of your dataset, also opening up opportunities for web publishing, as I'll discuss later in the section on XSL. Another interesting opportunity is the generation of XML documents describing Delphi objects. The DomCreate program has a button that describes a few properties of an object, again using the low-level DOM:
procedure AddAttr (iNode: IDOMNode; Name, Value: string);
var
  iAttr: IDOMNode;
begin
  iAttr := iNode.ownerDocument.createAttribute (name);
  iAttr.nodeValue := Value;
  iNode.attributes.setNamedItem (iAttr);
end;

procedure TForm1.btnObjectClick(Sender: TObject);
var
  iXml: IDOMDocument;
  iRoot: IDOMNode;
begin
  // empty the document
  XMLDoc.Active := False;
  XMLDoc.XML.Text := '';
  XMLDoc.Active := True;

  // root
  iXml := XmlDoc.DOMDocument;
  iRoot := iXml.appendChild (iXml.createElement ('Button1'));

  // a few properties as attributes (might also be nodes)
  AddAttr (iRoot, 'Name', Button1.Name);
  AddAttr (iRoot, 'Caption', Button1.Caption);
  AddAttr (iRoot, 'Font.Name', Button1.Font.Name);
  AddAttr (iRoot, 'Left', IntToStr (Button1.Left));
  AddAttr (iRoot, 'Hint', Button1.Hint);

  // show XML in memo
  Memo1.Lines := XmlDoc.XML;
end;
Of course, it is more interesting to have a generic technique capable of saving the properties of each Delphi component (or persistent object, to be more precise), recursing on persistent subobjects and indicating the names of referenced components. I've done this in the ComponentToDOM procedure, which uses the low-level RTTI information provided by the TypInfo unit, including the extraction of the list of component properties not having a default value. Once more, the program uses the simplified Delphi XML interfaces:
procedure ComponentToDOM (iNode: IXmlNode; Comp: TPersistent);
var
  nProps, i: Integer;
  PropList: PPropList;
  Value: Variant;
  newNode: IXmlNode;
begin
  // get list of properties
  nProps := GetTypeData (Comp.ClassInfo)^.PropCount;
  GetMem (PropList, nProps * SizeOf(Pointer));
  try
    GetPropInfos (Comp.ClassInfo, PropList);
    for i := 0 to nProps - 1 do
      if not IsDefaultPropertyValue(Comp, PropList [i], nil) then
      begin
        Value := GetPropValue (Comp, PropList [i].Name);
        NewNode := iNode.AddChild(PropList [i].Name);
        NewNode.Text := Value;
        if (PropList [i].PropType^.Kind = tkClass) and (Value <> 0) then
          if TObject (Integer(Value)) is TComponent then
            NewNode.Text := TComponent (Integer(Value)).Name
          else
            // TPersistent but not TComponent: recurse
            ComponentToDOM (newNode, TObject (Integer(Value)) as TPersistent);
      end;
  finally
    FreeMem (PropList);
  end;
end;
These two lines of code, in this case, trigger the creation of the XML document (shown in Figure 22.4): 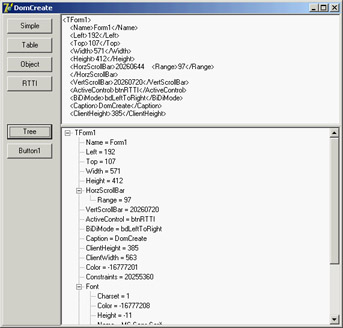
Figure 22.4: The XML generated to describe the form of the DomCreate program. Notice (in the tree and in the memo text) that properties of class types are further expanded. XMLDoc.DocumentElement := XMLDoc.CreateNode(Self.ClassName); ComponentToDOM (XMLDoc.DocumentElement, Self); XML Data-Binding InterfacesYou have seen that working with the DOM to access or generate a document is tedious, because you must use positional information and not logical access to the data. Also, handling series of repeated nodes of different possible types (as shown in the XML sample in Listing 22.1, describing books) is far from simple. Moreover, using a DOM, you can create any well-formed document; but (unless you use a validating DOM) you can add any subnode to any node, coming up with almost useless documents, because no one else will be able to manage them. To solve these issues, Borland added to Delphi an XML Data Binding Wizard, which can examine an XML document or a document definition (a schema, a Document Type Definition (DTD), or another type of definition) and generate a set of interfaces for manipulating the document. These interfaces are specific to the document and its structure and allow you to have more readable code, but they are certainly less generic as far as the types of documents you can handle (and this is more positive than it might sound at first). You can activate the XML Data Binding Wizard by using the corresponding icon in the first page of the IDE's New Items dialog box or by double-clicking the XMLDocument component. (It is odd that the corresponding command is not in the shortcut menu of the component.) After a first page in which you can select an input file, this wizard shows you the structure of the document graphically, as you can see in Figure 22.5 for the sample XML file from Listing 22.1. In this page, you can give a name to each entity of the generated interfaces, if you don't like the defaults suggested by the wizard. You can also change the rules used by the wizard to generate the names (an extended flexibility I'd like to have in other areas of the Delphi IDE). The final page gives you a preview of the generated interfaces and offers options for generating schemas and other definition files. 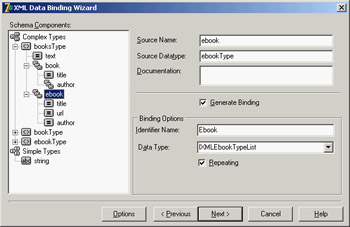
Figure 22.5: Delphi's XML Data Binding Wizard can examine the structure of a document or a schema (or another document definition) to create a set of interfaces for simplified and direct access to the DOM data. For the sample XML file with the author names, the XML Data Binding Wizard generates an interface for the root node, two interfaces for the elements lists of two different types of nodes (books and e-books), and two interfaces for the elements of the two types. Here are a few excerpts of the generated code, available in the XmlIntfDefinition unit of the XmlInterface example:
type
  IXMLBooksType = interface(IXMLNode)
    ['{C9A9FB63-47ED-4F27-8ABA-E71F30BA7F11}']
    { Property Accessors }
    function Get_Text: WideString;
    function Get_Book: IXMLBookTypeList;
    function Get_Ebook: IXMLEbookTypeList;
    procedure Set_Text(Value: WideString);
    { Methods & Properties }
    property Text: WideString read Get_Text write Set_Text;
    property Book: IXMLBookTypeList read Get_Book;
    property Ebook: IXMLEbookTypeList read Get_Ebook;
  end;

  IXMLBookTypeList = interface(IXMLNodeCollection)
    ['{3449E8C4-3222-47B8-B2B2-38EE504790B6}']
    { Methods & Properties }
    function Add: IXMLBookType;
    function Insert(const Index: Integer): IXMLBookType;
    function Get_Item(Index: Integer): IXMLBookType;
    property Items[Index: Integer]: IXMLBookType read Get_Item; default;
  end;

  IXMLBookType = interface(IXMLNode)
    ['{26BF5C51-9247-4D1A-8584-24AE68969935}']
    { Property Accessors }
    function Get_Title: WideString;
    function Get_Author: IXMLString_List;
    procedure Set_Title(Value: WideString);
    { Methods & Properties }
    property Title: WideString read Get_Title write Set_Title;
    property Author: IXMLString_List read Get_Author;
  end;
For each interface, the XML Data Binding Wizard also generates an implementation class that provides the code for the interface methods by translating the requests into DOM calls. The unit includes three initialization functions, which can return the interface of the root node from a document loaded in an XMLDocument component (or a component providing a generic IXMLDocument interface), or return one from a file, or create a brand new DOM: function Getbooks(Doc: IXMLDocument): IXMLBooksType; function Loadbooks(const FileName: WideString): IXMLBooksType; function Newbooks: IXMLBooksType; After generating these interfaces using the wizard in the XmlInterface example, I've repeated XML document access code that's similar to the XmlDomTree example but is much simpler to write (and to read). For example, you can get the attribute of the root node by writing procedure TForm1.btnAttrClick(Sender: TObject); var Books: IXMLBooksType; begin Books := Getbooks (XmlDocument1); ShowMessage (Books.Text); end; It is even simpler if you recall that while typing this code, Delphi's code insight can help by listing the available properties of each node, thanks to the fact that the parser can read in the interface definitions (although it cannot understand the format of a generic XML document). Accessing a node of one of the sublists is a matter of writing one of the following statements (possibly the second, with the default array property): Books.Book.Items[1].Title // full Books.Book[1].Title // further simplified You can use similarly simplified code to generate new documents or add new elements, thanks to the customized Add method available in each list-based interface. Again, if you don't have a predefined structure for the XML document, as in the dataset-based and RTTI-based examples of the previous demonstration, you won't be able to use this approach. Validation and SchemasThe XML Data Binding Wizard can work from existing schemas or generate a schema for an XML document (and eventually save it in a file with the .XDB extension). An XML document describes some data, but to exchange this data among companies, it must stick to some agreed structure. A schema is a document definition against which a document can be checked for correctness, an operation usually indicated with the term validation. The first—and still widespread—type of validation available for XML used document type definitions (DTDs). These documents describe the structure of the XML but cannot define the possible content of each node. Also, DTDs are not XML document themselves, but use a different, awkward notation. At the end of 2000, the W3C approved the first official draft of XML schemas (already available in an incompatible version called XML-Data within Microsoft's DOM). An XML schema is an XML document that can validate both the structure of the XML tree and the content of the node. A schema is based on the use and definition of simple and complex data types, similar to what happens in an OOP language. A schema defines complex types, indicating for each the possible nodes, their optional sequence (sequence, all), the number of occurrences of each subnode (minOccurs, maxOccurs), and the data type of each specific element. Here is the schema defined by the XML Data Binding Wizard for the sample books file: <?xml version="1.0"?>
<xs:schema xmlns:xs="http://www.w3.org/2001/XMLSchema"
xmlns:xdb="http://www.borland.com/schemas/delphi/7.0/XMLDataBinding">
<xs:element name="books" type="booksType"/>
<xs:complexType name="booksType">
<xs:annotation>
<xs:appinfo xdb:docElement="books"/>
</xs:annotation>
<xs:sequence>
<xs:element name="book" type="bookType" maxOccurs="unbounded"/>
<xs:element name="ebook" type="ebookType" maxOccurs="unbounded"/>
</xs:sequence>
<xs:attribute name="text" type="xs:string"/>
</xs:complexType>
<xs:complexType name="bookType">
<xs:annotation>
<xs:appinfo xdb:repeated="True"/>
</xs:annotation>
<xs:sequence>
<xs:element name="title" type="xs:string"/>
<xs:element name="author" type="xs:string" maxOccurs="unbounded"/>
</xs:sequence>
</xs:complexType>
<xs:complexType name="ebookType">
<xs:annotation>
<xs:appinfo xdb:repeated="True"/>
</xs:annotation>
<xs:sequence>
<xs:element name="title" type="xs:string"/>
<xs:element name="url" type="xs:string"/>
<xs:element name="author" type="xs:string"/>
</xs:sequence>
</xs:complexType>
</xs:schema>
Microsoft and Apache DOM engines have good support for schemas. Another tool I've used for validation is XML Schema Validator (XSV), an open-source attempt at a conformant schema-aware processor, which can be used either directly via the Web or after downloading a command-line executable (see the links to the current website of this tool in the W3C's XML Schema pages).
Using the SAX APIThe Simple API for XML (SAX) doesn't create a tree for the XML nodes, but parses the node—firing events for each node, attribute, value, and so on. Because it doesn't keep the document in memory, using the SAX allows you to manage much larger documents. Its approach is also useful for one-time examination of a document or retrieval of specific information. This is a list of the most important events fired by the SAX:
It is common to use a stack to handle the current path within the nodes tree, and push and pop elements to and from the stack for every StartElement and EndElement event. Delphi does not include specific support for the SAX interface, but you can import Microsoft's XML support (the MSXML library). In particular, for the SaxDemo1 example I've used version 2 of MSXML, because this version is widely available. I've generated a Pascal type library import unit from the type library, and the import unit is available within the source code of the program, but you must have that specific COM library registered on your computer to run the program successfully.
To use the SAX, you must install a SAX event handler within a SAX reader, and then load a file and parse it. I've used the SAX reader interface provided by MSXML for VB programmers. The official (C++) interface had a few errors in its type library that prevented Delphi from importing it properly. The main form of the SaxDemo1 example declares sax: IVBSAXXMLReader; In the FormCreate method, the sax variable is initialized with the COM object: sax := CoSAXXMLReader.Create; sax.ErrorHandler := TMySaxErrorHandler.Create; The code also sets an error handler, which is a class implementing a specific interface (IVBSAXErrorHandler) with three methods that are called depending on the severity of the problem: error, fatalError, and ignorableWarning. Simplifying the code a little, the SAX parser is activated by calling the parseURL method after assigning a content handler to it: sax.ContentHandler := TMySaxHandler.Create; sax.parseURL (filename) So, the code ultimately resides in the TMySaxHandler class, which has the SAX events. Because I have multiple SAX content handlers in this example, I've written a base class with the core code and a few specialized versions for specific processing. Following is the code of the base class, which implements both the IVBSAXContentHandler interface and the IDispatch interface the IVBSAXContentHandler interface is based on:
type
  TMySaxHandler = class (TInterfacedObject, IVBSAXContentHandler)
  protected
    stack: TStringList;
  public
    constructor Create;
    destructor Destroy; override;
    // IDispatch
    function GetTypeInfoCount(out Count: Integer): HResult; stdcall;
    function GetTypeInfo(Index, LocaleID: Integer; out TypeInfo):
      HResult; stdcall;
    function GetIDsOfNames(const IID: TGUID; Names: Pointer;
      NameCount, LocaleID: Integer; DispIDs: Pointer): HResult; stdcall;
    function Invoke(DispID: Integer; const IID: TGUID; LocaleID: Integer;
      Flags: Word; var Params; VarResult, ExcepInfo, ArgErr: Pointer):
      HResult; stdcall;
    // IVBSAXContentHandler
    procedure Set_documentLocator(const Param1: IVBSAXLocator);
      virtual; safecall;
    procedure startDocument; virtual; safecall;
    procedure endDocument; virtual; safecall;
    procedure startPrefixMapping(var strPrefix: WideString;
      var strURI: WideString); virtual; safecall;
    procedure endPrefixMapping(var strPrefix: WideString); virtual; safecall;
    procedure startElement(var strNamespaceURI: WideString;
      var strLocalName: WideString; var strQName: WideString;
      const oAttributes: IVBSAXAttributes); virtual; safecall;
    procedure endElement(var strNamespaceURI: WideString;
      var strLocalName: WideString; var strQName: WideString);
      virtual; safecall;
    procedure characters(var strChars: WideString); virtual; safecall;
    procedure ignorableWhitespace(var strChars: WideString);
      virtual; safecall;
    procedure processingInstruction(var strTarget: WideString;
      var strData: WideString); virtual; safecall;
    procedure skippedEntity(var strName: WideString); virtual; safecall;
  end;
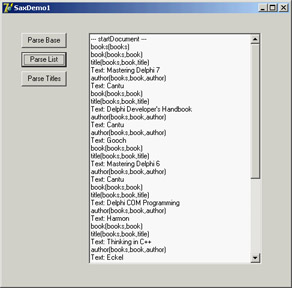
The most interesting portion, of course, is the final list of SAX events. All this base class does is emit information to a log when the parser starts (startDocument) and finishes (endDocument) and keep track of the current node and its parent nodes with a stack: // TMySaxHandler.startElement stack.Add (strLocalName); // TMySaxHandler.endElement stack.Delete (stack.Count - 1); An implementation is provided by the TMySimpleSaxHandler class, which overrides the startElement event triggered for any new node to output the current position in the tree with the following statement: Log.Add (strLocalName + '(' + stack.CommaText + ')');
The second method of the class is the characters event, which is triggered when a node value (or a test node) is encountered and outputs its content (as you can see in Figure 22.6):
procedure TMySimpleSaxHandler.characters(var strChars: WideString);
var
  str: WideString;
begin
  inherited;
  str := RemoveWhites (strChars);
  if (str <> '') then
    Log.Add ('Text: ' + str);
end;
This is a generic parsing operation affecting the entire XML file. The second derived SAX content handler class refers to the specific structure of the XML document, extracting only nodes of a given type. In particular, the program looks for nodes of the title type. When a node has this type (in startElement), the class sets the isbook Boolean variable. The text value of the node is considered only immediately after a node of this type is encountered:
procedure TMyBooksListSaxHandler.startElement(var strNamespaceURI,
  strLocalName, strQName: WideString; const oAttributes: IVBSAXAttributes);
begin
  inherited;
  isbook := (strLocalName = 'title');
end;

procedure TMyBooksListSaxHandler.characters(var strChars: WideString);
var
  str: string;
begin
  inherited;
  if isbook then
  begin
    str := RemoveWhites (strChars);
    if (str <> '') then
      Log.Add (stack.CommaText + ': ' + str);
  end;
end;
Mapping XML with TransformationsYou can use one more technique in Delphi to handle some XML documents: You can create a transformation to translate the XML of a generic document into the format used natively by the ClientDataSet component when saving data to a MyBase XML file. In the reverse direction, another transformation can turn a dataset available within a ClientDataSet (through a DataSetProvider component) into an XML file of a required format (or schema). Delphi includes a wizard to generate such transformations. Called the XML Mapping Tool, or XML Mapper for short, it can be invoked from the IDE's Tools menu or executed as a stand-alone application. The XML Mapper, shown in Figure 22.7, is a design-time helper that assists you in defining transformation rules between the nodes of a generic XML document and fields of the ClientDataSet data packet. 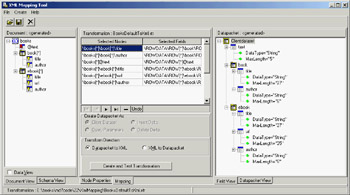
Figure 22.7: The XML Mapper shows the two sides of a transformation to define a mapping between them (with the rules indicated in the central portion). The XML Mapper window has three areas:
The Mapping page of the central pane also hosts the shortcut menu used to generate the transformation. The other panes and views have specific shortcut menus you can use to perform the various actions (besides the few commands in the main menu). You can use XML Mapper to map an existing schema (or extract it from a document) to a new data packet, an existing data packet to a new schema or document, or an existing data packet into an existing XML document (if a match is reasonable). In addition to converting the data of an XML file into a data packet, you can also convert to a delta packet of the ClientDataSet. This technique is useful for merging a document to an existing table, as if a user had inserted the modified table records. In particular, you can transform an XML document into a delta packet for records to be modified, deleted, or inserted. The result of using the XML Mapper is one or more transformation files, each representing a one-way conversion (so you need at least two transformation files to convert data back and forth). These transformation files are then used at design time and at run time by the XMLTransform, XMLTransformProvider, and XMLTransformClient components. As an example, I opened the books XML document, which has a structure that doesn't easily match a table, because it includes two lists of values of different types (I've skipped easier examples in which the XML has a plain rectangular structure). After opening the Sample.XML file in the XML Document section, I used its shortcut menu to select all of its elements (Select All) and to create the data packet (Create Datapacket From XML). This command automatically fills the right pane with the data packet and the central portion with the proposed transformation. You can also view its effect in a sample program by clicking the Create And Test Transformation button. Doing so opens a generic application that can load a document into the dataset using the transformation you've just created. In this case, the XML Mapper generates a table with two dataset fields: one for each possible list of subelements. This was the only possible standard solution, because the two sublists have different structures, and it is the only solution that allows you to edit the data in a DBGrid attached to the ClientDataSet and save it back to a complete XML file, as demonstrated by the XmlMapping example. This program is basically a Windows-based editor for a complex XML document. The example uses a TransformProvider component with two transformation files attached to read in an XML document and make it available to a ClientDataSet. As the name suggests, this component is a dataset provider. To build the user interface, I didn't connect the ClientDataSet directly to a grid, because it has a single record with a text field plus two detailed datasets. For this reason, I added to the program two more ClientDataSet components attached to the dataset fields and connected to two DBGrid controls. This explanation is easier to understand by looking at the definition of the non-visual components from DFM source code in the following excerpt and at its output in Figure 22.8. 
Figure 22.8: The XmlMapping example uses a TransformProvider component to make a complex XML document available for editing within multiple ClientData-Set components. object XMLTransformProvider1: TXMLTransformProvider TransformRead.TransformationFile = 'BooksDefault.xtr' TransformWrite.TransformationFile = 'BooksDefaultToXml.xtr' XMLDataFile = 'Sample.xml' end object ClientDataSet1: TClientDataSet ProviderName = 'XMLTransformProvider1' object ClientDataSet1text: TStringField object ClientDataSet1book: TDataSetField object ClientDataSet1ebook: TDataSetField end object ClientDataSet2: TClientDataSet DataSetField = ClientDataSet1book end object ClientDataSet3: TClientDataSet DataSetField = ClientDataSet1ebook end This program allows you to edit the data of the various sublists of nodes within the grids, modifying them and also adding or deleting records. As you apply the changes to the dataset (clicking the Save button, which calls ApplyUdpates), the transform provider saves an updated version of the file to disk. As an alternative approach, you can also create transformations that map only portions of the XML document into a dataset. As an example, see the BooksOnly.xtr file in the folder of the XmlMapping example. The modified XML document you'll generate will have a different structure and content from the original, including only the portion you've selected. So, it can be useful for viewing the data, but not for editing it.
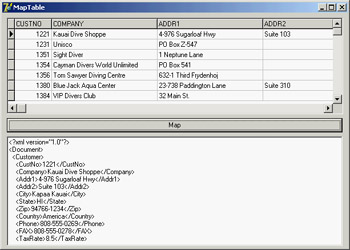
At the opposite side, you can see how a transformation can be used to take a database table or the result of a query and produce an XML file with a more readable format than that provided by default by the ClientDataSet persistence mechanism. To build the MapTable example, I placed a dbExpress SimpleDataSet component on a form and attached a DataSetProvider to it and a ClientDataSet to the provider. After opening the table and the client dataset, I saved its content to an XML file. At that point, I opened the XML Mapper, loaded the data packet file into it, selected all the data packet nodes (with the Select All command from the shortcut menu) and invoked the Create XML From Datapacket command. In the following dialog box, I accepted the default name mappings for fields and only changed the suggested name for record nodes (ROW) into something more readable (Customer). If you now test the transformation, the XML Mapper will display the contents of the resulting XML document in a custom tree view. After saving the transformation file, I was ready to resume developing the program, removing the ClientDataSet and adding a DataSource and a DBGrid (as a user might edit in on an attached DBGrid before transforming it), and an XMLTransformClient component. This component has the transformation file connected to it, but not an XML file. Instead, it refers to the data through the provider. Clicking the button shows the XML document within a memo (after formatting it) instead of saving it to a file, something you can do by calling the GetDataAsXml method (even if the Help file is far from clear about the use of this method):
procedure TForm1.btnMapClick(Sender: TObject);
begin
  Memo1.Lines.Text := FormatXmlData(XMLTransformClient1.GetDataAsXml(''));
end;
This is the only code for the program visible at run time in Figure 22.9; you can see the original dataset in the DBGrid and the resulting XML document in the memo control below the grid. The application has much simpler code than the DomCreate example I used to generate a similar XML document, but it requires the design-time definition of the transformation. The DomCreate example could work on any dataset at run time without any connection to a specific table, because it has rather generic code. In theory, it is possible to produce similar dynamic mappings by using the events of the generic XMLTransform component, but I find it easier to use the DOM-based approach discussed earlier. Notice also that the FormatXmlData call produces nicer output but slows down the program, because it involves loading the XML into a DOM. |
|
|||||||||||||||||||||||||||||||||||||||||||||||||||||||||||||||||||||||||||||||||||||||||||||||||||||||||||||||||||||||||||||||||||||||||||||||||||||||||||||||||||||||||||||||||||||||||||||||||||||||
|