|
|
|
ListView and TreeView ControlsIn the earlier section "Opening the Component Toolbox," I introduced the various visual controls you can use to display lists of values. The standard list box and combo box components are very common, but they are often replaced by the more powerful ListView and TreeView controls. These two controls are part of the Win32 common controls, stored in the ComCtl32.DLL library. Similar controls are available in Qt and VisualCLX, both on Windows and Linux. A Graphical Reference ListWhen you use a ListView component, you can provide bitmaps both indicating the status of the element (for example, the selected item) and describing the contents of the item in a graphical way. To connect the images to a list or tree, you need to refer to the ImageList component you've already used for the menu images. A ListView can have three image lists: one for the large icons (the LargeImages property), one for the small icons (the SmallImages property), and one for the state of the items (the StateImages property). In the RefList example, I've set the first two properties using two different ImageList components. Each item of the ListView has an ImageIndex, which refers to its image in the list. For this technique to work properly, the elements in the two image lists should follow the same order. When you have a fixed image list, you can add items to it using Delphi's ListView Item Editor, which is connected to the Items property. In this editor, you can define items and subitems. The subitems are displayed only in the detailed view (when you set the vsReport value of the ViewStyle property) and are connected with the titles set in the Columns property: 
In my RefList example (a simple list of references to books, magazines, CD-ROMs, and websites), the items are stored to a file, because users of the program can edit the contents of the list, which are automatically saved as the program exits. This way, edits made by the user become persistent. Saving and loading the contents of a ListView is not trivial, because the TListItems type doesn't have an automatic mechanism to save the data. As an alternative approach, I've copied the data to and from a string list, using a custom format. The string list can then be saved to a file and reloaded with a single command. The file format is simple, as you can see in the following saving code. For each list item, the program saves the caption on one line, the image index on another line (prefixed by the @ character), and the subitems on the following lines, indented with a tab character:
procedure TForm1.FormDestroy(Sender: TObject);
var
  I, J: Integer;
  List: TStringList;
begin
  // store the items
  List := TStringList.Create;
  try
    for I := 0 to ListView1.Items.Count - 1 do
    begin
      // save the caption
      List.Add (ListView1.Items[I].Caption);
      // save the index
      List.Add ('@' + IntToStr (ListView1.Items[I].ImageIndex));
      // save the subitems (indented)
      for J := 0 to ListView1.Items[I].SubItems.Count - 1 do
        List.Add (#9 + ListView1.Items[I].SubItems [J]);
    end;
    List.SaveToFile (ExtractFilePath (Application.ExeName) + 'Items.txt');
  finally
    List.Free;
  end;
end;
The items are then reloaded in the FormCreate method:
procedure TForm1.FormCreate(Sender: TObject);
var
  List: TStringList;
  NewItem: TListItem;
  I: Integer;
begin
  // stops warning message
  NewItem := nil;
  // load the items
  ListView1.Items.Clear;
  List := TStringList.Create;
  try
    List.LoadFromFile (
      ExtractFilePath (Application.ExeName) + 'Items.txt');
    for I := 0 to List.Count - 1 do
      if List [I][1] = #9 then
        NewItem.SubItems.Add (Trim (List [I]))
      else if List [I][1] = '@' then
        NewItem.ImageIndex := StrToIntDef (List [I][2], 0)
      else
      begin
        // a new item
        NewItem := ListView1.Items.Add;
        NewItem.Caption := List [I];
      end;
  finally
    List.Free;
  end;
end;
The program has a menu you can use to choose one of the different views supported by the ListView control and to add check boxes to the items, as in a CheckListBox control. You can see some combinations of these styles in Figure 5.12. 
Figure 5.12: Different examples of the output of a ListView compo-nent in the RefList program, obtained by changing the ViewStyle property and adding the check boxes Another important feature, which is common in the detailed or report view of the control, lets a user sort the items on one of the columns. In the VCL, this technique requires three operations. First, you set the SortType property of the ListView to stBoth or stData. This way, the ListView will sort based not on the captions, but by calling the OnCompare event for each two items it has to sort. Second, because you want to sort on each of the columns of the detailed view, you also handle the OnColumnClick event (which takes place when the user clicks on the column titles in the detailed view, but only if the ShowColumnHeaders property is set to True). Each time a column is clicked, the program saves the number of that column in the form class's nSortCol private field: procedure TForm1.ListView1ColumnClick(Sender: TObject; Column: TListColumn); begin nSortCol := Column.Index; ListView1.AlphaSort; end; Then, in the third step, the sorting code uses either the caption or one of the subitems according to the current sort column:
procedure TForm1.ListView1Compare(Sender: TObject;
  Item1, Item2: TListItem; Data: Integer; var Compare: Integer);
begin
  if nSortCol = 0 then
    Compare := CompareStr (Item1.Caption, Item2.Caption)
  else
    Compare := CompareStr (Item1.SubItems [nSortCol - 1],
      Item2.SubItems [nSortCol - 1]);
end;
In the CLX version of the program (called QRefList) you don't have to do any of the previous steps. The control is already capable of sorting itself properly when its caption is clicked. You automatically get multiple columns that auto-sort (both ascending and descending). The final features I've added to the program relate to mouse operations. When the user left-clicks an item, the RefList program shows a description of the selected item. Right-clicking the selected item sets it in edit mode, and a user can change it (keep in mind that the changes will automatically be saved when the program terminates). Here is the code for both operations, in the OnMouseDown event handler of the ListView control:
procedure TForm1.ListView1MouseDown(Sender: TObject; Button: TMouseButton;
  Shift: TShiftState; X, Y: Integer);
var
  strDescr: string;
  I: Integer;
begin
  // if there is a selected item
  if ListView1.Selected <> nil then
    if Button = mbLeft then
    begin
      // create and show a description
      strDescr := ListView1.Columns [0].Caption + #9 +
        ListView1.Selected.Caption + #13;
      for I := 1 to ListView1.Selected.SubItems.Count do
        strDescr := strDescr + ListView1.Columns [I].Caption + #9 +
          ListView1.Selected.SubItems [I-1] + #13;
      ShowMessage (strDescr);
    end
    else if Button = mbRight then
      // edit the caption
      ListView1.Selected.EditCaption;
end;
Although it is not feature-complete, this example shows some of the potential of the ListView control. I've also activated the "hot-tracking" feature, which lets the list view highlight and underline the item under the mouse. The relevant properties of the ListView can be seen in its textual description:
object ListView1: TListView
  Align = alClient
  Columns = <
    item
      Caption = 'Reference'
      Width = 230
    end
    item
      Caption = 'Author'
      Width = 180
    end
    item
      Caption = 'Country'
      Width = 80
    end>
  Font.Height = -13
  Font.Name = 'MS Sans Serif'
  Font.Style = [fsBold]
  FullDrag = True
  HideSelection = False
  HotTrack = True
  HotTrackStyles = [htHandPoint, htUnderlineHot]
  SortType = stBoth
  ViewStyle = vsList
  OnColumnClick = ListView1ColumnClick
  OnCompare = ListView1Compare
  OnMouseDown = ListView1MouseDown
end
This program is quite interesting, and I'll further extend it in Chapter 9 by adding a dialog box. To build its CLX version, QRefList, I had to use only one of the image lists and disable the small images and large images menus, because a ListView is limited to the list and report view styles. Large and small icons are available in a different control, called IconView. As previously mentioned, the sorting support was already there, which could have saved most of the code of the example. A Tree of DataNow that you've seen an example based on the ListView, let's examine the TreeView control. The TreeView has a user interface that is flexible and powerful (with support for editing and dragging elements). It is also standard, because it is the Windows Explorer user interface. There are properties and various ways to customize the bitmap of each line or each type of line. To define the structure of the TreeView nodes at design time, you can use the TreeView Items Editor: 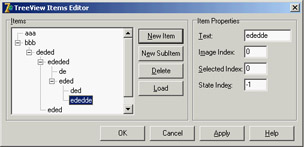
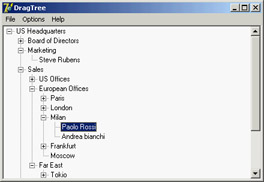
In this case, however, I've decided to load the TreeView data at startup, in a way similar to the last example. The Items property of the TreeView component has many member functions you can use to alter the hierarchy of strings. For example, you can build a two-level tree with the following lines: var Node: TTreeNode; begin Node := TreeView1.Items.Add (nil, 'First level'); TreeView1.Items.AddChild (Node, 'Second level'); Using the Add and AddChild methods, you can build a complex structure at run time. To load the information, you can again use a StringList at run time, load a text file with the information, and parse it. However, because the TreeView control has a LoadFromFile method, the DragTree and QDragTree examples use the following simpler code:
procedure TForm1.FormCreate(Sender: TObject);
begin
  TreeView1.LoadFromFile (ExtractFilePath (Application.ExeName) +
    'TreeText.txt');
end;
The LoadFromFile method loads the data in a string list and checks the level of each item by looking at the number of tab characters. (If you are curious, see the TTreeStrings.GetBufStart method, which you can find in the ComCtrls unit in the VCL source code included in Delphi.) The data I've prepared for the TreeView is the organizational chart of a multinational company, as you can see in Figure 5.13. Instead of expanding the node items one by one, you can also use the File ® Expand All menu of this program, which calls the FullExpand method of the TreeView control or executes the equivalent code (in this specific case of a tree with a root item): TreeView1.Items [0].Expand(True); Besides loading the data, the program saves the data when it terminates, making the changes persistent. It also has a few menu items to customize the font of the TreeView control and change some other simple settings. The specific feature I've implemented in this example is support for dragging items and entire subtrees. I've set the DragMode property of the component to dmAutomatic and written the event handlers for the OnDragOver and OnDragDrop events. In the first of the two handlers, the program makes sure the user is not trying to drag an item over a child item (which would be moved along with the item, leading to an infinite recursion):
procedure TForm1.TreeView1DragOver(Sender, Source: TObject;
  X, Y: Integer; State: TDragState; var Accept: Boolean);
var
  TargetNode, SourceNode: TTreeNode;
begin
  TargetNode := TreeView1.GetNodeAt (X, Y);
  // accept dragging from itself
  if (Source = Sender) and (TargetNode <> nil) then
  begin
    Accept := True;
    // determines source and target
    SourceNode := TreeView1.Selected;
    // look up the target parent chain
    while (TargetNode.Parent <> nil) and (TargetNode <> SourceNode) do
      TargetNode := TargetNode.Parent;
    // if source is found
    if TargetNode = SourceNode then
      // do not allow dragging over a child
      Accept := False;
  end
  else
    Accept := False;
end;
The effect of this code is that (except for the particular case you need to disallow) a user can drag a TreeView item over another item. Writing the code for moving the items is simple, because the TreeView control provides support for this operation through the TTreeNode class's MoveTo method:
procedure TForm1.TreeView1DragDrop(Sender, Source: TObject; X, Y: Integer);
var
  TargetNode, SourceNode: TTreeNode;
begin
  TargetNode := TreeView1.GetNodeAt (X, Y);
  if TargetNode <> nil then
  begin
    SourceNode := TreeView1.Selected;
    SourceNode.MoveTo (TargetNode, naAddChildFirst);
    TargetNode.Expand (False);
    TreeView1.Selected := TargetNode;
  end;
end;
The Portable Version of DragTreeBecause I use this program in numerous porting demonstrations, I've built a version you can compile as a native VCL application with Delphi and as a CLX application with Kylix. This is different from most other programs in this book, including the previous version of this same example, which can be ported to Delphi by using VisualCLX and also Qt on Windows. Following a different path once in a while can be instructive. The first thing I had to do was use two different sets of uses statements, using conditional compilation. The unit of the PortableDragTree example begins as follows:
unit TreeForm;

interface

uses
  SysUtils, Classes,

{$IFDEF LINUX}
  Qt, Libc, QGraphics, QControls, QForms, QDialogs,
  QStdCtrls, QComCtrls, QMenus, QTypes, QGrids;
{$ENDIF}

{$IFDEF MSWINDOWS}
  Windows, Graphics, Controls, Forms, Dialogs,
  StdCtrls, ComCtrls, Menus, Grids;
{$ENDIF}
A similar conditional directive is used in the initial portion of the implementation section, to include the proper resource file for the form (the two resource files are different):
{$IFDEF LINUX}
  {$R *.xfm}
{$ENDIF}

{$IFDEF MSWINDOWS}
  {$R *.dfm}
{$ENDIF}
I've omitted some of the Windows-specific features anyway, so the only difference in code is in the FormCreate method. The program loads the data file from the user's default folder, not the same folder as the executable. Depending on the operating system, the user's folder is the home directory (and the hidden file has a starting dot) or the specific My Documents area (available with a special API call):
procedure TForm1.FormCreate(Sender: TObject);
var
  path: string;
begin
{$IFDEF LINUX}
  filename := GetEnvironmentVariable('HOME') +
    '/.TreeText.txt';
{$ELSE}
  SetLength (path, 100);
  ShGetSpecialFolderPath (Handle, PChar(path),
    CSIDL_PERSONAL, False);
  path := PChar (path); // fix string length
  filename := path + '\TreeText.txt';
{$ENDIF}
  TreeView1.LoadFromFile (filename);
end;
Custom Tree NodesDelphi 6 added a few features to the TreeView controls, including multiple selection (see the MultiSelect and MultiSelectStyle properties and the Selections array), improved sorting, and several new events. The key improvement, however, is letting the programmer determine the class of the tree view's node items. Having custom node items implies the ability to attach custom data to the nodes in a simple, object-oriented way. To support this technique, there is a new AddNode method for the TTreeItems class and a new specific event, OnCreateNodesClass. In the handler for this event, you return the class of the object to be created, which must inherit from TTreeNode. This is a very common technique, so I've built an example to discuss it in detail. The CustomNodes example doesn't focus on a real-world case, but it shows a rather complex situation in which two different custom tree node classes are derived one from the other. The base class adds an ExtraCode property, mapped to virtual methods, and the subclass overrides one of these methods. For the base class, the GetExtraCode function simply returns the value; for the derived class, the value is multiplied to the parent node value. Here are the classes and this second method:
type
  TMyNode = class (TTreeNode)
  private
    FExtraCode: Integer;
  protected
    procedure SetExtraCode(const Value: Integer); virtual;
    function GetExtraCode: Integer; virtual;
  public
    property ExtraCode: Integer read GetExtraCode write SetExtraCode;
  end;

  TMySubNode = class (TMyNode)
  protected
    function GetExtraCode: Integer; override;
  end;

function TMySubNode.GetExtraCode: Integer;
begin
  Result := fExtraCode * (Parent as TMyNode).ExtraCode;
end;
With these custom tree node classes available, the program creates a tree of items, using the first type for the first-level nodes and the second class for the other nodes. Because you have only one OnCreateNodeClass event handler, the program uses the class reference stored in a private field of the form (CurrentNodeClass of type TTreeNodeClass): procedure TForm1.TreeView1CreateNodeClass(Sender: TCustomTreeView; var NodeClass: TTreeNodeClass); begin NodeClass := CurrentNodeClass; end; The program sets this class reference before creating nodes of each type—for example, with code like the following:
var
  MyNode: TMyNode;
begin
  CurrentNodeClass := TMyNode;
  MyNode := TreeView1.Items.AddChild (nil, 'item' + IntToStr (nValue))
    as TMyNode;
  MyNode.ExtraCode := nValue;
Once the entire tree has been created, when the user selects an item, you can cast its type to TMyNode and access the extra properties (but also methods and data):
procedure TForm1.TreeView1Click(Sender: TObject);
var
  MyNode: TMyNode;
begin
  MyNode := TreeView1.Selected as TMyNode;
  Label1.Caption := MyNode.Text + ' [' + MyNode.ClassName + '] = ' +
    IntToStr (MyNode.ExtraCode);
end;
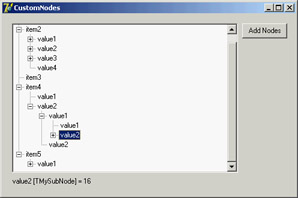
This is the code used by the CustomNodes example to display the description of the selected node in a label, as you can see in Figure 5.14. Note that when you select an item within the tree, its value is multiplied for that of each parent node. There are certainly easier ways to obtain this effect, but having a tree view with item objects created from different classes of a hierarchy provides an object-oriented structure upon which you can base some very complex code. |
|
|||||||||||||||||||||||||||||||||||||||||||||||||||||||||||||||||||||||||||||||||||||||||||||||||||||||||||||||||||||||||||||||||||||||||||||||||||||||||||||||||||||||||||||||||||||||||||
|