|
|
|
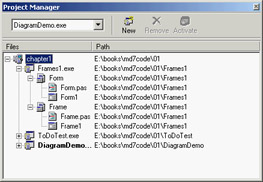
Managing ProjectsDelphi's multitarget Project Manager (View ® Project Manager) works on a project group, which can have one or more projects under it. For example, a project group can include a DLL and an executable file, or multiple executable files. All open packages will show up as projects in the Project Manager view, even if they haven't been added to the project group. In Figure 1.9, you can see the Project Manager with a simple project group, including all the examples of the current chapter. As you can see, the Project Manager is based on a tree view, which shows the hierarchical structure of the project group, the projects, and all the forms and units that make up each project. You can use the simple toolbar and the more complex shortcut menus of the Project Manager to operate on the projects in the group. The shortcut menu is context-sensitive; its options depend on the selected item. There are menu items to add a new or existing project to a project group, to compile or build a specific project, and to open a unit.
Of all the projects in the group, only one is active; this is the project you operate on when you select a command such as Project ® Compile. The Project menu has two commands you can use to compile or build all the projects of the group. (Strangely enough, these commands are not available in the shortcut menu of the Project Manager for the project group.) When you have multiple projects to build, you can set a relative order by using the Build Sooner and Build Later commands. These two commands basically rearrange the projects in the list.
Among the Project Manager's advanced features, you can drag source code files from Windows folders or Windows Explorer onto a project in the Project Manager window to add them to that project (drag-and-drop is also supported to open files in the code editor). You can easily see which project is selected and change it by using the combo box at the top of the Project Manager window, or by using the drop-down arrow next to the Run button on the Delphi toolbar. Besides adding Pascal files and projects, you can add Windows resource files to the Project Manager; they are compiled along with the project. Simply move to a project, select the Add shortcut menu item, and choose Resource File (*.rc) as the file type. This resource file will be bound to the project automatically, even without a corresponding $R directive. Delphi saves the project groups with the .BPG extension, which stands for Borland Project Group. This feature comes from C++Builder and from past Borland C++ compilers; this history is clearly visible when you open the source code of a project group, which is basically that of a makefile in a C/C++ development environment. Here is a simple example: #————————————————————————————— VERSION = BWS.01 #————————————————————————————— !ifndef ROOT ROOT = $(MAKEDIR)\.. !endif #————————————————————————————— MAKE = $(ROOT)\bin\make.exe -$(MAKEFLAGS) -f$** DCC = $(ROOT)\bin\dcc32.exe $** BRCC = $(ROOT)\bin\brcc32.exe $** #————————————————————————————— PROJECTS = Project1.exe #————————————————————————————— default: $(PROJECTS) #————————————————————————————— Project1.exe: Project1.dpr $(DCC) Project OptionsThe Project Manager doesn't provide a way to set the options of two different projects at one time. Instead, you can invoke the Project Options dialog from the Project Manager for each project. The first page of Project Options (Forms) lists the forms that should be created automatically at program startup and the forms that are created manually by the program. The next page (Application) is used to set the name of the application and the name of its Help file, and to choose its icon. Other Project Options choices relate to the Delphi compiler and linker, version information, and the use of run-time packages. There are two ways to set compiler options. One is to use the Compiler page of the Project Options dialog. The other is to set or remove individual options in the source code with the {$X+} and {$X-} directives, where you replace X with the option you want to set. This second approach is more flexible, because it allows you to change an option only for a specific source-code file, or even for just a few lines of code. The source-level options override the compile-level options. All project options are saved automatically with the project, but in a separate file with a .DOF extension. This is a text file you can easily edit. You should not delete this file if you have changed any of the default options. Delphi also saves the compiler options in another format in a CFG file, for command-line compilation. The two files have similar content but a different format: The dcc command-line compiler cannot use .DOF files, but needs the .CFG format. Another alternative for saving compiler options is to press Ctrl+O+O (press the O key twice while keeping Ctrl pressed). This key combination inserts, at the top of the current unit, compiler directives that correspond to the current project options (including all of the new compiler warning settings), as in the following listing:
{$A8,B-,C+,D+,E-,F-,G+,H+,I+,J-,K-,L+,M-,N+,O+,P+,Q-,R-,S-,T-,U-,V+,W-,X+,Y+,Z1}
{$MINSTACKSIZE $00004000}
{$MAXSTACKSIZE $00100000}
{$IMAGEBASE $00400000}
{$APPTYPE GUI}
{$WARN SYMBOL_DEPRECATED ON}
{$WARN SYMBOL_LIBRARY ON}
{$WARN SYMBOL_PLATFORM ON}
{$WARN UNIT_LIBRARY ON}
{$WARN UNIT_PLATFORM ON}
{$WARN UNIT_DEPRECATED ON}
{$WARN HRESULT_COMPAT ON}
{$WARN HIDING_MEMBER ON}
{$WARN HIDDEN_VIRTUAL ON}
{$WARN GARBAGE ON}
{$WARN BOUNDS_ERROR ON}
{$WARN ZERO_NIL_COMPAT ON}
{$WARN STRING_CONST_TRUNCED ON}
{$WARN FOR_LOOP_VAR_VARPAR ON}
{$WARN TYPED_CONST_VARPAR ON}
{$WARN ASG_TO_TYPED_CONST ON}
{$WARN CASE_LABEL_RANGE ON}
{$WARN FOR_VARIABLE ON}
{$WARN CONSTRUCTING_ABSTRACT ON}
{$WARN COMPARISON_FALSE ON}
{$WARN COMPARISON_TRUE ON}
{$WARN COMPARING_SIGNED_UNSIGNED ON}
{$WARN COMBINING_SIGNED_UNSIGNED ON}
{$WARN UNSUPPORTED_CONSTRUCT ON}
{$WARN FILE_OPEN ON}
{$WARN FILE_OPEN_UNITSRC ON}
{$WARN BAD_GLOBAL_SYMBOL ON}
{$WARN DUPLICATE_CTOR_DTOR ON}
{$WARN INVALID_DIRECTIVE ON}
{$WARN PACKAGE_NO_LINK ON}
{$WARN PACKAGED_THREADVAR ON}
{$WARN IMPLICIT_IMPORT ON}
{$WARN HPPEMIT_IGNORED ON}
{$WARN NO_RETVAL ON}
{$WARN USE_BEFORE_DEF ON}
{$WARN FOR_LOOP_VAR_UNDEF ON}
{$WARN UNIT_NAME_MISMATCH ON}
{$WARN NO_CFG_FILE_FOUND ON}
{$WARN MESSAGE_DIRECTIVE ON}
{$WARN IMPLICIT_VARIANTS ON}
{$WARN UNICODE_TO_LOCALE ON}
{$WARN LOCALE_TO_UNICODE ON}
{$WARN IMAGEBASE_MULTIPLE ON}
{$WARN SUSPICIOUS_TYPECAST ON}
{$WARN PRIVATE_PROPACCESSOR ON}
{$WARN UNSAFE_TYPE OFF}
{$WARN UNSAFE_CODE OFF}
{$WARN UNSAFE_CAST OFF}
Compiling and Building ProjectsThere are several ways to compile a project. If you run the project (by pressing F9 or clicking the Run toolbar icon), Delphi will compile it first. When Delphi compiles a project, it compiles only the files that have changed. If you select Project ® Build All instead, every file is compiled, even if it has not changed. You should only need this second command infrequently, because Delphi can usually determine which files have changed and compile them as required. The only exception is when you change some project options, in which case you have to use the Build All command to put the new options into effect. To build a project, Delphi first compiles each source code file, generating a Delphi Compiled Unit (DCU). (This step is performed only if the DCU file is not already up to date.) The second step, performed by the linker, is to merge all the DCU files into the executable file, optionally with compiled code from the VCL library (if you haven't decided to use packages at run time). The third step is binding into the executable file any optional resource files, such as the RES file of the project, which hosts its main icon, and the DFM files of the forms. You can better understand the compilation steps and follow what happens during this operation if you enable the Show Compiler Progress option (in the Preferences page of the Environment Options dialog box).
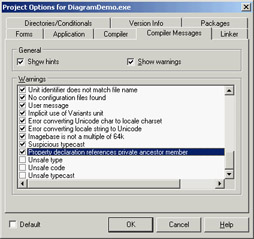
The Compile command can be used only when you have loaded a project in the editor. If no project is active and you load a Pascal source file, you cannot compile it. However, if you load the source file as if it were a project, that will do the trick and you'll be able to compile the file. To do this, simply select the Open Project toolbar button and load a PAS file. Now you can check its syntax or compile it, building a DCU. I've mentioned before that Delphi allows you to use run-time packages, which affect the distribution of the program more than the compilation process. Delphi packages are dynamic link libraries (DLLs) containing Delphi components. By using packages, you can make an executable file much smaller. However, the program won't run unless the proper DLLs (such as vcl70.bpl, which is quite large) are available on the computer where you want to run the program. If you add the size of this dynamic library to that of the small executable file, the total amount of disk space required by the apparently smaller program built with run-time packages is much larger than the space required by the apparently bigger stand-alone executable file. Of course, if you have multiple applications on a single system, you'll end up saving a lot, both in disk space and memory consumption at run time. The use of packages is often but not always recommended. I'll discuss all the implications of packages in detail in Chapter 10. In both cases, Delphi executables are extremely fast to compile, and the speed of the resulting application is comparable to that of a C or C++ program. Delphi compiled code runs at least five times faster than the equivalent code in interpreted or "semicompiled" tools. Compiler Message Helpers and WarningsAs I mentioned at the beginning of this chapter (in the section "Extended Compiler Messages and Search Results in Delphi 7"), in addition to the classic compiler messages, Delphi 7 provides a new window with additional information about some error messages. This window is activated using the View ® Additional Message Info menu command. It displays information stored in a local file, which can be updated by downloading a new version from Borland's website. Another change in Delphi 7 relates to the increased control you have over compiler warnings. The Project Options dialog box now includes a Compiler Messages page where you can choose many individual warnings. This feature was probably introduced due to the fact that Delphi 7 has a new set of warnings related to compatibility with the future Delphi for .NET tool. These warnings are quite extensive, and I've disabled them as shown in Figure 1.10. You can also enable or disable some of these warnings using compiler options like these: {$Warn UNSAFE_CODE OFF}
{$Warn UNSAFE_CAST OFF}
{$Warn UNSAFE_TYPE OFF}
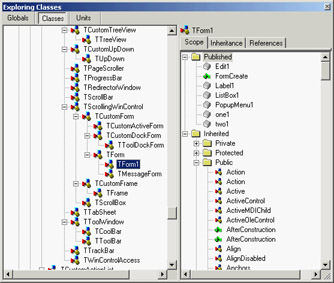
In general, it is better to keep these settings outside the source code of the program—something Delphi 7 finally allows you to do. Exploring a Project's ClassesDelphi has always included a tool to browse the symbols of a compiled project, although this tool's name has changed many times (from Object Browser to Project Explorer and now to Project Browser). In Delphi 7, you activate the Project Browser window using the View ® Browser menu command, which displays the window shown in Figure 1.11. The browser allows you to see the hierarchical structure of the project's classes and to look for its symbols and the source-code lines where they are referenced. Unlike the Code Explorer, the Project Browser is updated only as you recompile the project. This browser allows you to list classes, units, and globals, and lets you choose whether to look only for symbols defined within your project or for those from both your project and VCL. You can change the settings of the Project Browser and those of the Code Explorer in the Explorer page of the Environment Options or by selecting the Properties command in the shortcut menu of the Project Explorer. Some of the categories you see in this window are specific to the Project Browser; others relate to both tools. |
|
||||||||||||||||||||||||||||||||||||||||||||||||||||||||||||||||||||||||||||||||||||||||||||||||||||||||||||||||||||||||||||||||||||||||||||||||||||||||||||||||||||||||||||||||||||||||||||||
|